Thursday, April 29, 2010

Spring Onion Corn Muffins

It's that weird time of year in Minneapolis where it can be 75 F one day & 50 F the next so, even though we are moving more towards warm weather dishes, there are still plenty of chilly nights calling for something more winter-like. The other night was one of those so I whipped up a basic black bean chili & these tasty corn muffins.
Spring Onion Corn Muffins
These are pretty basic corn muffins that I dressed up a bit with some items I had on hand, spring onions & frozen corn kernels. Those two little additions just seem to take cornbread to the next level. I like the sweetness & texture the corn kernels (ours were minnesota sweet corn we had frozen last summer) added & that slight bite provided by the onions. They got a big thumbs up from Matt too.
Chili with Spring Onion Corn Muffins
This recipe makes just four muffins which is perfect for two people but you can easily double it to make more.

Spring Onion Corn Muffins
(adapted from Small-Batch Baking)

1/4 c all-purpose flour
1/4 c yellow cornmeal
2 t sugar
1/4 t baking powder
1/8 t baking soda
1/8 t salt
3 T unsalted butter, melted & cooled
1 large egg
3 T milk
3/4 t white vinegar
1 spring onion, chopped (a scallion would work as well)
2 T frozen corn kernels, thawed

Preheat the oven to 375 F. Prepare 4 muffin tins with paper cups or by greasing.

Mix the flour, cornmeal, sugar, baking powder, baking soda & salt together in a bowl & set aside.

Whisk the butter, egg, milk & vinegar together in another bowl. Pour into the dry mixture & add the onions & corn kernels. Mix until just combined. Let sit 5 minutes.

Fill the prepared muffin tins 1/2 full. Bake for 15 minutes or until a toothpick inserted into the middle comes out clean.

Cool on a rack for a few minutes & serve warm.

Makes 4

If you are not reading this post in a feed reader or at http://agoodappetite.blogspot.com OR at http://agoodappetite.com then the site you are reading is illegally publishing copyrighted material. Contact me at katbaro AT yahoo DOT COM. All recipes, text and photographs in this post are the original creations & property of the author unless otherwise noted.© 2007-2010 Kathy Lewinski

Wednesday, April 28, 2010

Banana Peanut Butter Muffins

When I was a kid I went through a kick where my favorite after school snack was a banana & chunky peanut butter. I would sit with the jar of peanut butter on my lap & spread each bite of the banana with it. I don't know what made me think of that lately but it inspired these muffins.
Banana Peanut Butter Muffin
These were certainly a hit around our house, Matt had eaten two before I even knew it. The balance of the banana & peanut butter flavor is just right without one overpowering the other. I like them best a little warm, maybe with a touch of good butter, yum.

I didn't have chunky peanut butter in the house so I used creamy & them just added some chopped peanuts for the texture. If you have chunky go ahead & leave the peanuts out.

Banana Peanut Butter Muffins

1/2 c + 2 T all-purpose flour
1/2 c whole wheat flour
1 t baking powder
1/2 t baking soda
1/4 t salt
2 ripe bananas, mashed
6 T peanut butter
1/2 c brown sugar
2 T honey
1 1/2 t vanilla extract
1 large egg
1/4 c chopped peanuts

Preheat oven to 375 F. Prepare 8 or 9 muffin tins with papers or by greasing them.

Stir the flours, baking powder, baking soda & salt together in a bowl & set aside.

Mix the banana, peanut butter, brown sugar, honey, vanilla & egg together in another bowl. I found heating the peanut butter in the microwave for a few minutes made it easier to stir in.

Mix the wet mixture into the dry & stir until just combined. Fold in the peanuts.

FIll the muffin tins 3/4 fill. Bake for about 22 minutes until golden brown & a toothpick inserted into the middle comes out clean.

Makes 8 - 9 muffins

If you are not reading this post in a feed reader or at http://agoodappetite.blogspot.com OR at http://agoodappetite.com then the site you are reading is illegally publishing copyrighted material. Contact me at katbaro AT yahoo DOT COM. All recipes, text and photographs in this post are the original creations & property of the author unless otherwise noted.© 2007-2010 Kathy Lewinski

Tuesday, April 27, 2010

Penne with Creamy Spinach, Mushrooms and Bacon

Between our pork belly class at Corner Table on Wednesday & our early birthday celebration at Craftsman on Saturday, we felt like we'd been eating ourselves silly last week. Come Sunday, we really wanted something that would come together easily, be comforting & use items we had in our fridge...thus this pasta.
#115 - Penne with Creamy Spinach, Mushrooms & Bacon
Ok, with the heavy cream & bacon this isn't the lightest dish but really per serving you aren't getting that much. Plus you are eating a lot of spinach & only 2 ounces of pasta. But forget all of that stuff because, this pasta just tastes really good & that's what food is about, right. The sauce is rich thanks to the sherry, cream & mushrooms, it almost tasted like a lighter version of stroganoff sauce. The spinach retains its bright green color & the bacon adds a shot of red making for a dish that looks as good on the plate as it tastes.

Penne with Creamy Spinach, Mushrooms & Bacon

2 slices of bacon, chopped
4 oz brown mushrooms, sliced
2 spring onions, chopped
1/2 T unsalted butter
1 1/2 T all-purpose flour
1/2 c chicken stock
1/2 c heavy cream
1/2 t sherry
salt & pepper
4 cups, loosely packed spinach, torn
4 oz cooked penne
Grated parmesan, optional

In a large skillet cook the bacon over medium heat until crispy. Remove to a paper towel covered plate & set aside.

Add the mushrooms & onions to the pan. Cook until the mushrooms have released all their liquid & the liquid as mostly cooked off. Add the butter & melt. Sprinkle the flour over everything & cook while stirring for 1 minute. Add the chicken stock. Cook while stirring until bubbly & thick. Stir in the cream and sherry. Season to taste with salt & pepper.

Just before serving stir in the bacon & spinach. Cook until the spinach is wilted, a minute or two. Stir in the cooked pasta. Heat through. Serve with parmesan sprinkled on top if desired.

2 servings.

If you are not reading this post in a feed reader or at http://agoodappetite.blogspot.com OR at http://agoodappetite.com then the site you are reading is illegally publishing copyrighted material. Contact me at katbaro AT yahoo DOT COM. All recipes, text and photographs in this post are the original creations & property of the author unless otherwise noted.© 2007-2010 Kathy Lewinski

Monday, April 26, 2010

Weekly Menu 4/26 - 5/1/10

It was pretty rainy & overcast in the Twin Cities this weekend. We really needed the rain so We were happy to see it & so was our garden. The broccoli & peas are looking strong & the micro greens have started peeking up through the dirt. The peppers & tomatoes under the growing light have really taken off & I need to transplant most of them to bigger containers.
#113 - Transplants
Despite the grump weather, we took a trip out to the Minnesota Landscape Arboretum. We've been going almost every other week since spring hit because the changes this time of year are so fast. We didn't want to miss this weekend as they said it was going to be the best for spring color & they did not disappoint.
Crabapple Grove
The crabapple grove was just a mass of pink & white. It was like a scene in a fairy tale.
Tulips
The tulips displays were amazing.
Iris
The colors in the Iris Garden just blew us away. We were sorry that we won't be around when the rest of it comes to bloom.

On to Menu Planning Monday...

A pretty simple menu this week. I'm trying to use things in the fridge up before vacation.

Penne with Creamy Spinach, Mushrooms & Bacon

Cottage Pie

Pork Chops with Mashed Parsnips

Chili with spring onion corn muffins

Homemade Pizza

Soy Glazed Tuna

If you are not reading this post in a feed reader or at http://agoodappetite.blogspot.com OR at http://agoodappetite.com then the site you are reading is illegally publishing copyrighted material. Contact me at katbaro AT yahoo DOT COM. All recipes, text and photographs in this post are the original creations & property of the author unless otherwise noted.© 2007-2010 Kathy Lewinski

Saturday, April 24, 2010

Indian-Spiced Parsnip Muffins

It always surprises me when people say they don't like parsnips, I figure they really must not have tried them because this vegetable is a certainly a treat in my book. Right now you can get over-wintered parsnips in the farmer's market. These parsnips have had the winter to build up sugars & are at their sweetest & tastiest making them perfect for baked goods. (They're also great roasted or mashed.)
Indian-Spiced Parsnip Muffins
I was inspired to make these parsnip muffins after we had the parsnip cake for dessert at our Pork Belly class Wednesday. Then Mr. Orph over at Mr. Orph's Kitchen posted a carrot cake that he flavored with a chai spice blend. I thought that was a brilliant idea & decided to use garam masala to flavor mine. Ok, we absolutely loved the favor it added to the these. Then I added pistachios for a good crunch & some raisins for a little sweetness. These muffins rose beautifully & were quite light compared to a lot of other carrot-type muffins I've had. We seriously loved these muffins!
Indian-Spiced Parsnip Muffin
I went back & forth about whether to call these muffins or cupcakes. Matt thought they were a little more of a muffin but topped with a little Devonshire cream like we did last night (or perhaps some cream cheese frosting) these make a really tasty dessert. Plain they were perfect with our scrambled eggs for breakfast. Next time someone tells me they don't like parsnips I'm going to give them one of these muffins without telling them what's in it & watch the conversion begin.

***Update 4/28: there was originally a mistake in the recipe with the amount of flour. It has been corrected.

Indian-Spiced Parsnip Muffins

3/4 c + 2 T all-purpose flour
1/4 c sugar
1/4 t salt
1/2 t baking soda
1 t garam marsala
6 T milk
1 t white vinegar
1 egg yolk
1/2 t vanilla
1/2 c grated parsnip
2 T chopped pistachios
2 T golden raisins

Preheat oven to 350 F.

In a medium bowl stir the flour, sugar, salt, baking soda & garam marsala together to blend. Set aside.

In a small bowl whisk the milk, vinegar, egg yolk & vanilla together. Pour into the flour mixture & stir until just blended. Fold in the parsnips, pistachios & raisins.

Prepare 6 muffin cups either with muffin papers or by buttering & flouring them. Fill the cups 3/4 full with the batter. Bake for 21 - 23 minutes until the muffins are golden brown & a toothpick inserted into the center comes out clean.

Cool completely on a rack before adding frosting.

Makes 6 cupcakes.

If you are not reading this post in a feed reader or at http://agoodappetite.blogspot.com OR at http://agoodappetite.com then the site you are reading is illegally publishing copyrighted material. Contact me at katbaro AT yahoo DOT COM. All recipes, text and photographs in this post are the original creations & property of the author unless otherwise noted.© 2007-2010 Kathy Lewinski

Thursday, April 22, 2010

...And We Made Little Piggies of Ourselves

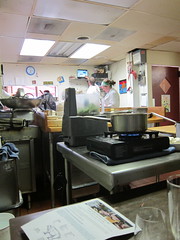
Last night Matt & I were lucky enough to get a couple of seats in the kitchen for one of Scott Pampuch's Pork Belly Classes at Corner Table. I say lucky because with seating limited to 4 or 6 these classes sell out quickly. The evening started with us meeting the 4 other diners over a glass of Frisk muscat-reisling. With that we were escorted into the kitchen for a night of good conversation, great drinks, lessons in curing, an amazing meal & a little tongue.
IMG_2745Matt & BubblyIMG_2752
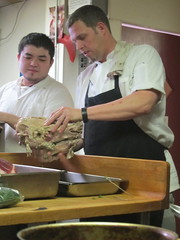
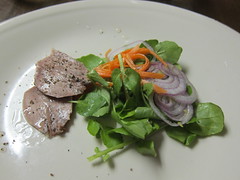
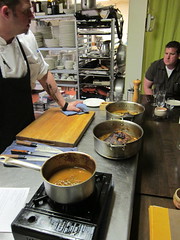
Scott started the class by talking about where pork belly was in the pig & how we don't often see the big meaty middle of the pig slabs because that meat is usually left on country-style ribs. I asked him if he had butchered these pigs we were himself & we got a whole lesson on how the pigs are processed & then brought to him for butchering in the restaurant. This lead to the entrance of the pig head. Once it was out Scott decided he was going to make us a salad with the tongue. Not a pretty site to see prepared (Matt confessed to me later that he wasn't sure he could eat it) but the flavor & texture were wonderful. It reminded us a lot of a good paté. The tongue was thinly sliced & served with watercress, carrots, red onions, salt & pepper. A very simple presentation that was so fresh. The salad was served with a nice reisling.
BellyPig headPork Tongue Salad
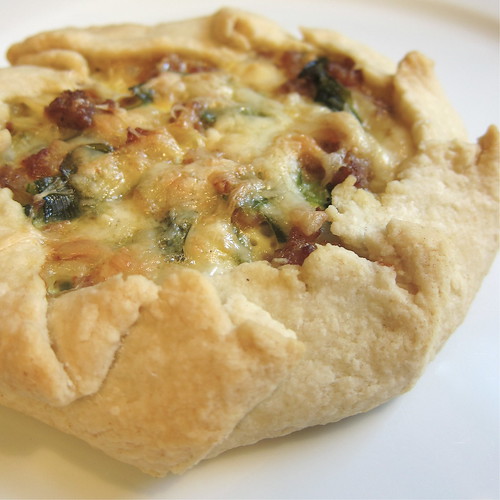
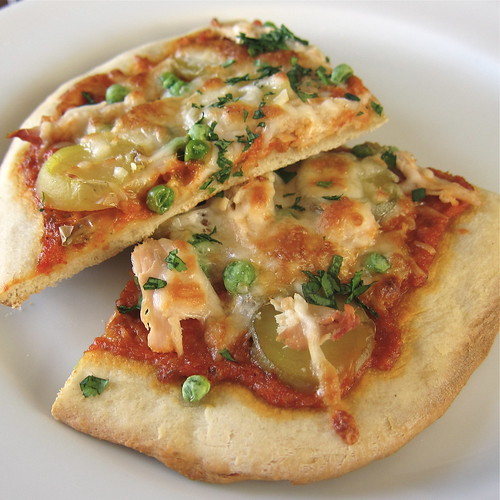
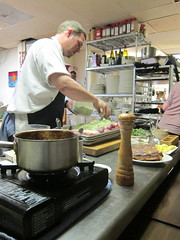
From there we went back to the pork belly & learned how to cure it to make both pancetta & bacon. While Scott was demoing the curing we were served crisp little pizzas topped with nettles & parmesan plus a glass of white cotes de rhone. I adored this pizza & know this is what I'll do with nettles next time I get them.
CuringNettle Pizza
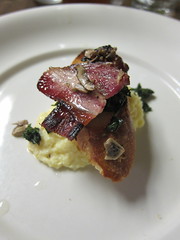
The next course was one of my favorites. Slow scrambled eggs topped with a toasted baguette, nettles, bacon & pickled mushrooms. I think I'm just a sucker for Scott's slow scrambled eggs, they are so wonderfully soft.
slow scrambled eggs
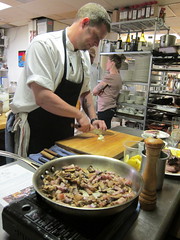
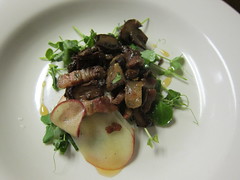
Next on the menu was pea shoots topped with mushrooms that had been cooked with pancetta and garlic. Here Scott talked about letting things cook low & slow so they get crispy & flavors meld together. Thinly sliced apple added some nice sweetness. To compliment the earthy flavor of the salad we had a glass of Rush River Unforgiven Amber.
Making saladPancetta & Mushrooms Salad
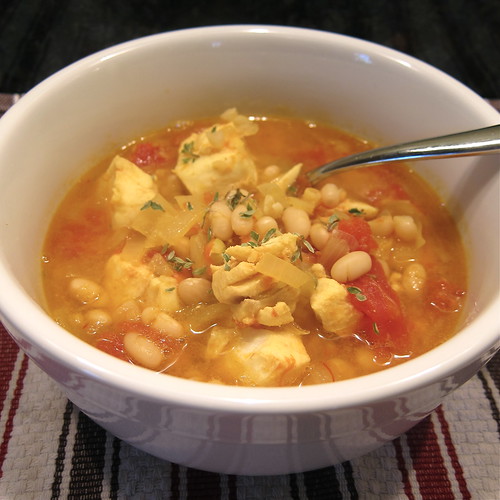
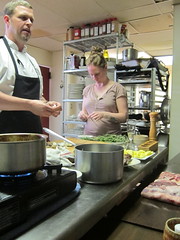
As Scott began to cook us some soup we were served a glass of Rosé Cava, this was new to most of us & we loved it. The soup was made with pork stock which Scott says is his favorite to cook with & I can't wait to try making at home. To the stock he added a little of the pig head meat, some sliced tongue, raw cured pancetta, a quail egg, nettle pesto, garlic oil & orange zest. That orange zest really sang against the richness of the rest of the soup.
pork stock soup
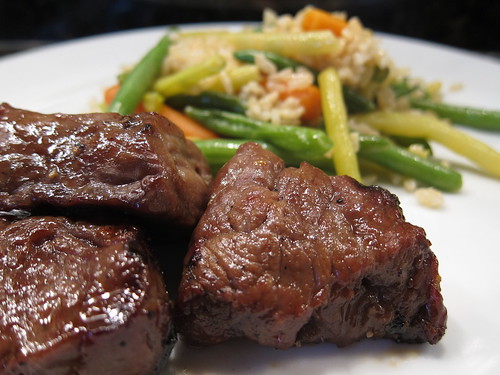
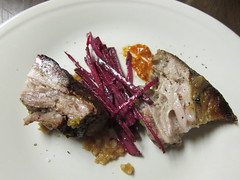
Next course was the star of the show, two braised pork bellies. Scott talked about how one was braised using vinegar while the other was not. He said the vinegar makes the pork belly more even in flavor, easier to eat & brings out more of the other flavors. He wanted us to try them side by side to see if we could taste the difference. You really could & most of us felt the one braised with the vinegar was superior, it seems to cut through some of the fattiness. The bellies were served with a Hungarian mustard, an apple mostarda and a beet salad. The whole thing was topped off with an Agro Dulce Sauce, a sauce made with equal parts stock & orange juice then seasoned with rosemary, garlic & vinegar. The sweet & sour flavor went well with the fatty pork belly. A red wine from the Dal region of Portugal was served with this course.
talking braisetwo braised pork bellies
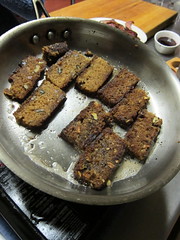
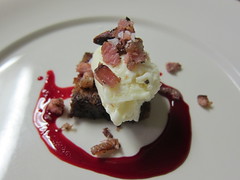
For dessert, Scott started by frying up some house-cured bacon. Then he took slices of parsnip cake & fried it in the bacon fat! He told us how they can't sell the parsnip cake in the restaurant because people are scared by the word parsnip. I don't know why as it was great & a lot like carrot cake. The fried bread was then topped with vanilla ice cream, beet caramel sauce & bacon with allspice. All of this with a lovely glass of sherry.
Parsnip cake frying in bacon fatParsnip cake fried in bacon fat...
The meal ended with what Scott called a Maple Sap Bacontini. Raw maple sap topped a dollop of maple syrup in a shot glass with a bacon garnish. The idea was to taste the flavor of the sap versus the maple syrup. The raw sap is so light. This was served with an angry bacon turtle, bacon pieces topped with a Rouge truffle & Indian chili.
Maple Sap Bacontini
Really what an amazing evening. Matt & I both felt we got more than our money's worth. You get to watch a chef at work in the kitchen, improvising as he goes along to produce your meal, & learn some of the tricks of the trade. We loved the spontaneity of the class & how it was so interactive with the diners. Scott was able to add new things, such as the tongue salad, based on questions we asked & things we were interested in. If you live in the Twin Cities area we highly recommend taking one of Scott's classes for a truly delicious & entertaining night out. Classes are coming up in How to stock your pantry for easy entertaining, Butchering a whole pig (Oh, I wish we were here for that one!) & How to use your CSA. Visit Corner Table for more info & to sign up.

If you are not reading this post in a feed reader or at http://agoodappetite.blogspot.com OThe R at http://agoodappetite.com then the site you are reading is illegally publishing copyrighted material. Contact me at katbaro AT yahoo DOT COM. All recipes, text and photographs in this post are the original creations & property of the author unless otherwise noted.
© 2007-2010 Kathy Lewinski

Wednesday, April 21, 2010

Sausage and Spring Onion Pie

Pie...Galette...Rustic Tart...I guess this dish could be called any of those things. Let's just say it's a yummy filling of Italian sausage, fresh spring onions & melted cheese in a tender, flakey crust. Sound good? Well, it was!
#110 - Sausage & Spring Onion Pie
I used the spring onions we picked up at the Mpls Farmer's Market this weekend. Spring onions are usually a little bigger & have lightly rounder bulbs than scallions or green onions. They also can have more of a bite to them which means they held their own against the spicy sausage. If you can't get spring onions, green onions will be a fine substitute.
Fol Epi Cheese
For the cheese in this pie we were lucky enough to recieve a wedge of Fol Epi from Ile de France Cheese*. They let us pick which cheese to try & we picked one we'd never tasted before. Fol Epi is a semi-soft, cow's milk cheese that reminded us of a Swiss cheese but a little milder taste. It was really good for lunch on ham sandwiches, perfect in this pie & also good just for snacking. It melted beautifully & would probably make a rocking grilled cheese. We just love getting to try cheese that is new to us.

Sausage & Spring Onion Pie

Crust

2/3 c all-purpose flour
1/8 t kosher salt
4 T (2 oz) cold unsalted butter, cut into chunks (if you use salted butter leave out the salt)
1 T + 1 t cold water

Put the flour & salt into a food processor & pulse a few times to blend. Add the butter & pulse until the mixture is the texture of a course meal. Sprinkle in the water & pulse. Test the dough to see if it holds together by pinching it. If it is too dry add more water 1 teaspoon at a time until it reaches the right texture. Form the dough into two balls. Flatten the balls into discs. Wrap with plastic wrap and chill for 1/2 hour

Filling

1/2 T olive oil
4 oz bulk hot Italian sausage
4 large spring onions, chopped, try to keep the white & light green parts separate from the more tender dark green parts (I ended up with between 1 1/2 & 2 cups)
1 egg, beaten
2 oz Fol Epi cheese, grated
melted butter

Heat the olive oil in a skillet over medium-high heat. Add the sausage plus the white & light green parts of the onions. Sauté until the sausage is cooked & the onion is very tender. Add the darker green parts of the onion & continue to cook until tender. Remove from the heat & let cool to almost room temperature. Once cooled mix in the egg & cheese (if you wish save a little of the cheese to sprinkle on the top).

Preheat oven to 425 F.

Roll the dough discs out to about 8" circles 1/8" thick. Place the circles on a baking sheet that is either covered with a silicone pad or greased. Spoon half of the the filling into the middle of each circle leaving about 1 to 1 1/2 inch border. Fold the border over the filling, pleating as you go along. Brush the crust with some melted butter. Sprinkle some cheese over the showing filling if you saved some for this purpose.

Bake for 10 minutes. Reduce heat to 375 F & cook another 20 minutes or until the crust is golden brown & the filling has set. Let cool a few minutes before serving.

2 servings.

*Ile de France sent us cheese to sample but we were not given any other consideration to write about or review it.

If you are not reading this post in a feed reader or at http://agoodappetite.blogspot.com OR at http://agoodappetite.com then the site you are reading is illegally publishing copyrighted material. Contact me at katbaro AT yahoo DOT COM. All recipes, text and photographs in this post are the original creations & property of the author unless otherwise noted.
© 2007-2010 Kathy Lewinski

Tuesday, April 20, 2010

Tikka Masala Pizza

One thing we grew to love while living in San Francisco was Indian Pizza. It's not something we've found in Minneapolis so, we're left to make it for ourselves. Previously, we've made one with Indian BBQ Sauce but it wasn't really exactly the same. I remembered that the pizza we loved so much had a tikka masala sauce so that's what we tried this time.
Tikka Masala Pizza
This was totally it, the Indian Pizza we had been looking for. The sauce, which was adapted from 660 Curries, was sweet with a touch of spic & worked perfectly as a pizza sauce. Since I was using cooked chicken that wouldn't be marinated, like it typically is in chicken tikka masala, I added some of the seasonings that would have been in the marinate to the crust dough instead.

For all you purists out there before you leave a comment saying this isn't Indian & this isn't really Tikka Masala (which isn't Indian either), I know it's not traditional. It's a pizza made with what are typically Indian flavors & spices & heck we loved it.

Tikka Masala Pizza

Crust

1/2 c warm water
1/2 t yeast
1/4 t ground cumin
1/4 t ground ginger
pinch turmeric
pinch cardamon
1 t kosher salt
1 T olive oil + more for greasing the bowl
1 1/2 c all-purpose flour

Put the water into a medium bowl. Add the yeast, cumin, ginger, turmeric, cardamon, salt & olive oil. Stir to mix. Add the 1/2 cup at a time. Knead until you get a smooth dough adding more flour is needed. Put a little oil in the bowl. Put the dough in the bowl & roll to coat with oil. Cover with a towel & let rise until doubled in size, about 2 hours.

Makes enough for 1 pizza

Tikka Masala Sauce

1 T butter
1/2 c roughly chopped onion
1 jalapeno, seeded & chopped
1/4 c roast red pepper
2 T sliced or slivered almonds
2 T golden raisins
1/2 c diced tomatoes, including juice
2 T heavy cream
1/8 t garam masala
1/8 t cayenne pepper
good pinch of kosher salt

In a small saucepan melt the butter over medium-high heat. Add the onion, jalapeno, red pepper, almonds & raisins. Cook stirring from time to time until soft & golden brown, about 10 - 12 minutes. Add the tomatoes, deglazing the pan is necessary. Put into a food processor. Add the cream, garam masala, cayenne & salt. Process until you get a thick, sort of gritty sauce.

Enough for 1 pizza with a little leftover (looks like its just enough for me to use on a couple chicken breasts)

Topping

5 small yukon gold potatoes, cooked for about 15 minutes
1/4 - 1/3 c frozen peas
1/4 c cooked shredded chicken
grated mozzarella
2 T chopped cilantro

Let the potatoes cool & then slice thin.

Preheat oven to 475 F. Grease a baking sheet. Press the dough out on the sheet to create a thin crust pizza. Spread the sauce over the pizza. Top with the potatoes, peas & chicken. Sprinkle the cheese over the top. Bake for 13 - 15 minutes until the cheese is melted & the crust is brown. Sprinkle with cilantro & serve.

2 -3 servings.

If you are not reading this post in a feed reader or at http://agoodappetite.blogspot.com OR at http://agoodappetite.com then the site you are reading is illegally publishing copyrighted material. Contact me at katbaro AT yahoo DOT COM. All recipes, text and photographs in this post are the original creations & property of the author unless otherwise noted.
© 2007-2010 Kathy Lewinski

Monday, April 19, 2010

Eating Seasonably in a Northern Climate

Lately in my daily food blog & cooking magazine readings I've been so tempted by all the recipes featuring spring treats like asparagus, peas & strawberries but, I have to content myself with just bookmaking them for the time being. You see, here in Minneapolis its not unusual for us to have just had our last snow fall of the season so those spring treats are still a few weeks, if not a month, away. Our grocery store does have all of these items from California, Mexico, etc... but Matt & I are trying to eat more seasonably & locally. We aren't doing this 100% (hello, morning banana, I'm talking about you) but we are definitely much more conscience of where our food is from & when it is available. I think this time of year is particularly hard as we are really craving those fresh spring greens & tired of the foods of winter. Luckily the Minneapolis Farmer's Market was open for an impromptu market this weekend.
Flowers to PlantVeggies for the Garden
Most of the market was local meats, fresh flowers, vegetables & flowers to plant, and produce from California & Mexico but we were happy to find a few local early spring vegetables.
Spring Farmer's Market Haul
I can't tell you how thrilled I was to see this baby spinach, spring onions & over-wintered parsnips from Little Canada, MN. Plus I filled my whole basket for $5.00!

This year we'll spend more time preparing to get through winter & early spring. We'll freeze more broccoli, beans, corn, spinach & kale. Last year we finished all our frozen beans in November!
#219 - Our Stash
We'll can as much as we did last year if not more. I can't tell you how much we have enjoyed that stash of homemade jams, relishes, salsas & canned tomatoes in our basement. I do believe we'll go a whole year without buying any of those items from a store.

I think this is a good time to mention we won't be doing a CSA this year. We have really enjoyed being members of Harmony Valley over the last two years. We've got to try so many new things & it helped us to focus on what was in season. At the same time using what was in the box sometimes became a burden for the two of us, we often found ourselves leaving things at the pick up site because we don't care for them or knew we wouldn't get through them. On top of that we just love our local farmer's market, The Kingfield Market. We find it such a treat to go there on Sunday mornings & plan our weekly menu by what is in the market. We like getting a chance to talk to the farmers. So instead of seeing what was in our CSA box every two weeks now we'll be showing you what's in season in the market & how we use it.

On to Menu Planning Monday...

Chicken Tikka Masala - using some chicken breasts we got at the farmers market & left over sauce from last week tikka masala pizza (recipe tomorrow)

Sausage & Spring Onion Tart

Wednesday we are talking a Pork Belly Cooking Class at Corner Table

Beef Phyllo Rolls

Grilled Steak Salad

Saturday I think we'll be eating out again first lunch at the Chef Shacks Earth Day Party & then probably dinner at Craftsman.

If you are not reading this post in a feed reader or at http://agoodappetite.blogspot.com OR at http://agoodappetite.com then the site you are reading is illegally publishing copyrighted material. Contact me at katbaro AT yahoo DOT COM. All recipes, text and photographs in this post are the original creations & property of the author unless otherwise noted.
© 2007-2010 Kathy Lewinski

Friday, April 16, 2010

Sliders on Hawaiian Bread Rolls

When we were making up the menu for this week Matt suggested we have burgers one night, he had seen some online that were on Hawaiian bread rolls & he wanted to try that. I decided to take the opportunity to try making my own Hawaiian bread & Matt tried a different method for cooking the burgers. We both thought the end result was one of the best burgers we've ever made!
Slider on Homemade Hawaiian Bread
I found a lot of recipes on line for Hawaiian bread so I combined what I learned from this & that to make my dough. This is a rich, sweet dough not unlike a brioche though not as quite as heavy. I left it to Matt to decide how to shape the bread & he went with pull apart rolls similar to the Hawaiian bread you get in the store. They turned out really fluffy & the perfect size for sliders. I'm not sure if they tasted exactly like Hawaiian bread but they were really good.
Hawaiian Bread Rolls

Hawaiian Bread Rolls

1/2 c warm water
1/2 c pineapple juice
1/4 c melted salted butter + more for brushing on the rolls before baking
1 T dry yeast
1/2 T kosher salt
1 large egg, beaten
1/2 t vanilla extract
6 T sugar
3 c all-purpose flour

Put the water, pineapple juice & melted butter in a large container. Stir in the yeast. Add the salt, egg, vanilla & sugar, stir again. Add the flour 1 cup at a time. If it gets too hard to stir in with a spoon use your hand to incorporate it all. You should have a soft dough. Cover loosely & let sit at room temperature until doubled in size, 2 - 3 hours.

At this point you can shape the rolls, rise them again & bake them but I put the covered container in the fridge & let it sit overnight ala Artisan Bread in Five Minutes a Day.

On baking day prepare two loaf pans by spraying them with non-stick spray. Shape the dough into sixteen 1 1/2 - 1 3/4 ounce balls (if the dough is a little stiff let it warm up a bit before shaping). Cover with a towel & let rise until doubled in size, 2 - 3 hours.

Preheat oven to 350 F. Brush the rolls with melted butter. Bake for 20 minutes or until golden brown. Cool on a rack.

Makes 16 rolls.

Matt says he based his method for cooking these burgers on the steaming that White Castle does. He used a large skillet to create a lid over the burgers on the grill so that they cooked in their own steam. They came out so tender & juicy. I also loved the onions cooked with the burgers.

Matt's Sliders

1/2 pound of ground grass- fed beef
1 t steak seasoning
3 dashed worcestershire sauce
1 t salt
1/2 c chopped onion
non-stick spray
5 small slices of cheese, optional (we used monterey jack)

Mix the beef with the steak seasoning. worcestershire & salt. Form into 5 patties.

Heat a griddle over medium heat. Spray with non-stick spray. Sprinkle the onions on the griddle. Place the patties on top of the onions. Use a skillet or other large pan to cover the burgers. Let cook for 3 minutes. Flip burgers over, add a cheese slice to the top of each burger if using & replace lid. Cook another 2 - 3 minutes for medium.

Serve on Hawaiian Bread Rolls that have been split in half with the toppings of your choice.

Makes 5 sliders.

If you are not reading this post in a feed reader or at http://agoodappetite.blogspot.com OR at http://agoodappetite.com then the site you are reading is illegally publishing copyrighted material. Contact me at katbaro AT yahoo DOT COM. All recipes, text and photographs in this post are the original creations & property of the author unless otherwise noted.
© 2007-2010 Kathy Lewinski

Wednesday, April 14, 2010

Saffron Fish and White Bean Soup

Something about this recipe just called out to me, "make me, make me." I think it was probably the seductive song of the saffron & fennel. Whatever it was, I'm certainly glad I listened.
#103 - Saffron Fish & Bean Soup
This is a really filling soup but it isn't heavy at all. It's full of bright flavors & smells amazing. The flavors are slightly exotic but still comforting. Need something fabulous on a busy night this soup will fit the bill, if your beans are cooked ahead of time or you use canned, it'll only take about 20 minutes to get it on the table. Makes sure to serve it with a crusty bread as you'll want something to sop up the broth!

Saffron Fish and White Bean Soup
(adapted from Cooking Light April '10)

1/2 c dry white beans (or 7 oz canned)
1/2 T olive oil
1 small onion, chopped
1/2 t fennel seeds, crushed with a mortar & pestle
1/4 t ground coriander
2 cloves garlic, minced
2 -3 sprigs fresh thyme
1/4 t saffron threads
3/4 c water
8 oz bottle calm juice
1 c diced tomatoes including juices
1/2 t kosher salt
1/2 - 3/4 lb of firm white fish, we used halibut, cut into 2-inch pieces

Soak & then simmer beans in 1 1/2 cups water until soft. Drain & set aside. (If using canned drain & then rinse them.)

Heat the olive oil in a large heavy pot over medium-high heat. Add the onion, fennel, coriander, garlic & one thyme sprig. Cook for 5 minutes.

Add the saffron threads, crushing them with your fingers as you add them to the pot. Pour in the water, clam juice and tomatoes. Bring to a boil. Reduce heat to simmer & let cook for 5 minutes.

Add the salt, fish & beans. Let cook for 5 more minutes. The fish should be cooked through & flaky. Remove the sprig of thyme.

Divide between two bowls. Remove leaves from remaining springs of thyme & sprinkle on top

2 large servings.

If you are not reading this post in a feed reader or at http://agoodappetite.blogspot.com OR at http://agoodappetite.com then the site you are reading is illegally publishing copyrighted material. Contact me at katbaro AT yahoo DOT COM. All recipes, text and photographs in this post are the original creations & property of the author unless otherwise noted.
© 2007-2010 Kathy Lewinski

Tuesday, April 13, 2010

Angel Food Surprise Cupcakes

We had a wonderful Easter dinner at my sister's this year & it was topped off by an angel food cake made by her mother-in-law, Penny. It was beautiful & light, covered with a whip cream frosting. But the best part was the surprise in the middle. She has cut it into two layers & sprinkled crushed Heath bars in between the layers then added more frosting to hold the layers together. I like it so much I wanted to try making a cupcake version.
Mini Angel Food Cakes
Instead of cutting the cupcakes into layers I decided to cook the candy right into them. This meant the chocolate & the smaller pieces of toffee melted creating a layer in the middle. The bigger pieces of toffee stayed crunchy. Next time I might leave more in bigger chunks. These cupcakes shrink quite a bit when cooling (does angel food always do this?) making them a perfect 2 - 3 bite treat.

Angel Food Surprise Cupcakes
(adapted from Small Batch Baking)

2 T + 2 t all-purpose flour
1 t cornstarch
4 T superfine sugar (or granulated sugar ground fine in a food processor)
pinch of nutmeg
2 large egg white, at room temp
pinch of salt
1/4 t vanilla extract
1/4 t cream of tartar
5 - 6 t chopped chocolate covered toffee candy (Heath, Skor, Daim)
Whipped cream

Preheat oven to 350 F.

Mix the flour, cornstarch, sugar & nutmeg together & set aside.

Put the egg whites, salt & vanilla in a small mixing bowl. Beat on medium until frothy. Add the cream of tartar & beat until soft peaks form. While the mixer is still running slowly add the sugar. Beat on high until stiff peaks are formed. Fold in half of the flour mixture. Once incorporated fold in the second half.

Fill five 1/2 cup muffin tins half full with the batter (you can line the muffin tins with paper cups or leave plain & loosen the backed cupcakes with the help of a sharp knife). Sprinkle the chopped candy on top of the batter. Top off with the remaining batter, completely covering the candy.

Bake for 10 minutes. After 10 minutes drape a piece of tin foil lightly over the cupcakes. Bake for another 8 minutes or until the cupcakes are golden brown & spring back when pressed lightly in the middle. Cool cupcakes on a rack. The cupcakes will probably shrink up a bit but don't worry they still taste good.

Top with whipped cream.

Makes 5 cupcakes.

Double fisting
The Easter cake was a hit with the little ones, especially with a cupcake chaser.

If you are not reading this post in a feed reader or at http://agoodappetite.blogspot.com OR at http://agoodappetite.com then the site you are reading is illegally publishing copyrighted material. Contact me at katbaro AT yahoo DOT COM. All recipes, text and photographs in this post are the original creations & property of the author unless otherwise noted.
© 2007-2010 Kathy Lewinski

Monday, April 12, 2010

Weekly Menu 4/12 - 4/17/10

Such a beautiful weekend here in Minneapolis. Sunny skies with temperatures in the upper 60's made it perfect for getting outside. We headed to the MN Landscape Arboretum to see what was in bloom & were treated to a show of bulbs & wildflowers in bloom. The trees might not be green yet but there was plenty of other color.
Blue & Pink HyacinthDrumstick Primrose#101 - Bloodroot
Pink MagnoliaPink HyacinthDaffodil
Then it was home to work outside seeding the grass, hanging the storm windows & preparing new garden beds. All that work was rewards with easy dinners on the grill including this delicious Kalbi beef.
#101 - Kalbi Beef
I've never had Kalbi before but it sounded good so we picked some up from our local butcher. Basically it is grilled beef that has been marinated in Korean soy sauce along with other seasonings. We plan on trying making this marinade ourselves soon since it was so tasty.

On to Menu Planning Monday...

Saffron Fish Soup

Hamburgers on Hawaiian Style Buns

Baked Pasta with Hot Italian Sausage

Tikka Pizza

Homemade grilled sausage

We're having new lighting installed in the kitchen so Friday we'll probably end up eating out.

If you are not reading this post in a feed reader or at http://agoodappetite.blogspot.com OR at http://agoodappetite.com then the site you are reading is illegally publishing copyrighted material. Contact me at katbaro AT yahoo DOT COM. All recipes, text and photographs in this post are the original creations & property of the author unless otherwise noted.
© 2007-2010 Kathy Lewinski

Friday, April 9, 2010

Bricken Chicken

Now that the snow has melted & the temperatures are staying above 40 F, the aroma of grilling can be caught in the air every evening through all the neighborhoods of Minneapolis. We are unable to resist its temptation & are happy to be headed back to our backyard grill. So, we pulled the last of the chicken from our freezer (no, more chicken from the local farm until June!) & Matt decided he wanted to try grilling it under bricks.
Brick Chicken
Spatchcocking is our favorite way to prepare a chicken for roasting & this just takes that one step further by pressing the bird even flatter with bricks. The results are really pretty fabulous. You end up with a juicy bird that has been very evenly cooked. & the skin is to die for. We couldn't stop ourselves from nibbling on the wings & drumettes even before dinner hit the plate. We'll definitely be making chicken this way again throughout grilling season.

Here's how Matt made his Bricken Chicken (he came up with the name).
Chicken ready for the grill
Follow our instructions for spatchcocking a chicken. Season your chicken anyway you like. We used some minced garlic & a blend of Italian herbs. Then rub the whole thing with some olive oil.
Bricks for the grill
Wrap two bricks with foil. Use bricks that are solid so they are heavy. Heat the grill to medium/medium-low.
Chicken on skin side down
Oil the grill grates & place the chicken on skin side down.
Bricks on top of the chicken
Place the bricks on top of the chicken to press it as flat as possible.
Brick Chicken
When the skin side is golden brown & starting to get crispy remove the bricks & flip the chicken over. For us that took 23 minutes. We chose not to put the bricks back on the chicken because we didn't want to ruin that beautiful skin, I know some people do put the bricks back on at this point. Then just cook until the chicken is cooked through & the juices run clear. We had a pretty small chicken, about 3 lbs, so we only needed 15 minutes more.
Brick Chicken
Remove the chicken from the grill & let rest about 5 minutes before carving. It's hard to resist that little beauty!

If you are not reading this post in a feed reader or at http://agoodappetite.blogspot.com OR at http://agoodappetite.com then the site you are reading is illegally publishing copyrighted material. Contact me at katbaro AT yahoo DOT COM. All recipes, text and photographs in this post are the original creations & property of the author unless otherwise noted.
© 2007-2010 Kathy Lewinski
Related Posts with Thumbnails

Get Email Updates!

Enter your email address:

Delivered by FeedBurner

Measurement Abbreviations

T = Tablespoon
t = teaspoon
c = cup
lb = pound
oz - ounce

Labels

Blog Archive

Contributors

Blog Directory for Minneapolis, Minnesota