Friday, January 29, 2010

Rösti with Baked Eggs

This was a dish we had high hopes for...
#28 - Rösti with Baked Egg
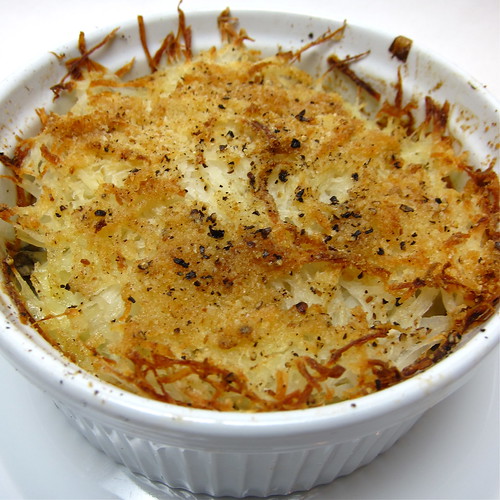
I mean basically its cheesy hash browns with an egg on top, what doesn't sound good about that. Unfortunately, we found it a little disappointing & I don't know why. At first I thought I didn't care for the taste of the turnip in it but that actually really grew on me & Matt liked it from the start. Maybe it needed a different cheese. (I can see cheddar being really good.) I think onions would add a lot more flavor instead of the chives. It did definitely need more salt & mixing the egg in with the potatoes helped too.

To be upfront I did make a few changes. The original recipe called for frozen hash browns, I grated a fresh potato instead. I probably put in twice as much turnip as needed but I didn't want to have half a turnip hanging around. Other than that I stuck pretty close to the original recipe other than making 2 servings instead of 8.

I think this idea has promise but needs some tweaking.

Rösti with Baked Eggs
(adapted from Cooking Light Jan/Feb '10)

5 T plain yogurt
1 1/2 t all-purpose flour
1 russet potato, peeled & grated
1 small turnip, peeled & grated
1 1/4 oz Gruyere cheese, grated
1 T unsalted butter, melted
2 T fresh chives, chopped
1/4 t salt
pepper
pinch of nutmeg
2 large eggs

Preheat oven to 400 F. Grease two 1 1/2 cup ramekins.

Mix the yogurt & flour together in a medium bowl. Add the potato, turnip, cheese, butter & chives, stir to mix. Add the salt, a few grinds of fresh pepper & the nutmeg. Stir to blend everything. Divide between the two ramekins. Place on a baking sheet & then put into the oven Bake for 30 minutes, until bubbly.

Remove from the oven & make an indentation in the top of each dish with the back of a spoon. (We found a small ladle worked well for this.
Rösti with Baked Egg
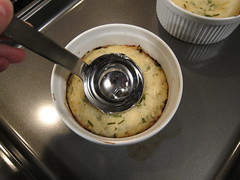
Break one egg into each.
Rösti with Baked Egg
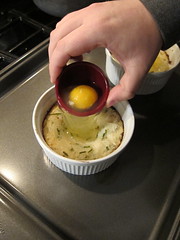
Return to the oven & bake for 8 more minutes or until the egg whites are firm. (Ours were taking forever to firm up so we broiled them for a minute or two.)

2 servings

If you are not reading this post in a feed reader or at http://agoodappetite.blogspot.com OR at http://agoodappetite.com then the site you are reading is illegally publishing copyrighted material. Contact me at katbaro AT yahoo DOT COM. All recipes, text and photographs in this post are the original creations & property of the author unless otherwise noted.
© 2007-2010 Kathy Lewinski

Thursday, January 28, 2010

Red Beans, Sausage & Rice

Sometimes there is nothing more comforting than a bowl of slow cooked beans over rice.
#27 - Red Bean, Sausage & Rice
Matt has been talking about making this for two weeks & we finally got around to it last night. It was freezing cold outside so I ate a big bowl of this in front of the fireplace & it warmed me right up.

This is super simple to make but it does take time, though most of that time is hands off. You want your beans to cook low & slow until they are tender & creamy. The creaminess of the beans plays so well with the texture of the sausage & rice. The seasonings are pretty basic, it didn't even need salt, but our andouille was flavorful & had a bit of spice to it which adds a lot to the soup. If your andouille isn't as spicy or you like thing hot add a little more cayenne & some hot sauce.

Red Beans, Sausage & Rice

2 T olive oil
2 yellow onions, diced
1 celery stalk, diced
2 red peppers, seeded & diced
12 oz andouille sausage, cut in half length-wise then into half moon slices
1 lb red kidney beans
1/4 t cayenne pepper
3 bay leaves
Hot cooked white rice

Heat the olive oil in a large heavy soup pot over medium-high heat. Add the onions, celery, peppers & sausage. Cook until the onions are translucent, stirring often. Add the beans, cayenne & bay leaves then enough water to cover everything by about an inch. Bring to a boil. Reduce heat, cover & simmer for about 2 hours or until the beans are tender. Stir from time to time to keep the beans from sticking to the bottom. Add more water as needed. Once the beans are tender, remove the lid & cook until creamy.

Serve over hot white rice. Add hot sauce if desired.

6 - 7 Servings

Note: I think you could easily make this in a slow cooker though since I haven't tried it I'm not sure of the timing.

If you are not reading this post in a feed reader or at http://agoodappetite.blogspot.com OR at http://agoodappetite.com then the site you are reading is illegally publishing copyrighted material. Contact me at katbaro AT yahoo DOT COM. All recipes, text and photographs in this post are the original creations & property of the author unless otherwise noted.
© 2007-2010 Kathy Lewinski

Wednesday, January 27, 2010

Miso Glazed Salmon

Lookie, here we are eating more healthy for us oily fish. Though salmon cooked like this makes eating healthy easy.
#26 - Miso Glazed Salmon
We had a lot of miso left over from making soups in the last couple of weeks & since we need to get more fish in our diets Matt suggested using it in a glaze on salmon. What a good choice. The sweet & salty taste of the glaze tastes so good with the salmon and look at how beautiful it is, all shiny & brown & everything. Plus how much quicker can you get than mixing three ingredients together & then broiling a piece of fish for 10 minutes?! Broiling the salmon left it perfectly flaky & moist.

I tried an experiment with the side dish. I cooked some Kashi 7 Whole Grain Pilaf in our rice cooker & threw a knob of fresh ginger & a garlic clove in with it. I was hoping the flavors of the garlic & ginger would infuse the pilaf while cooking. Hoping is the optimal word here, the pilaf smelled great while cooking but you couldn't taste the ginger or garlic at all, bummer.

Miso Glazed Salmon

2 t red miso paste
4 t brown sugar
2 T soy sauce
2 6-oz salmon filets
chives, chopped (optional)

Heat broiler on high & set rack about 6 inches from the flame.

Mix the miso, brown sugar & soy sauce together until well blended.

Spray a little cooking spray on a baking sheet. Place the salmon on skin side down. Coat the top with some of the miso glaze.
Miso Glazed Salmon
Place under the broiler & cook for about 10 minutes until flaky & tender, re-coating with glaze 2 or 3 more times during cooking.

Place on plates & sprinkle with chopped chives (optional).

Serves 2


If you are not reading this post in a feed reader or at http://agoodappetite.blogspot.com OR at http://agoodappetite.com then the site you are reading is illegally publishing copyrighted material. Contact me at katbaro AT yahoo DOT COM. All recipes, text and photographs in this post are the original creations & property of the author unless otherwise noted.
© 2007-2010 Kathy Lewinski

Tuesday, January 26, 2010

Potato and Chorizo Tacos

I think if Matt had his way we'd eat Mexican food a couple times a week so, he was pretty happy when he got Rick Bayless' Mexico One Plate At A Time for Christmas. Now he's got lots of new recipes to try.
#25 - Potato & Chorizo Tacos
This was one quick meal! Matt started cooking at 6:00 & we were eating by 6:30, perfect for a busy night. These tacos are full of flavor from the chorizo & the wonderful avocado salsa (Rick calls it salsa to me it was much more like guacamole.) The chorizo we bought was quite spicy so the avocado on top adds some needed coolness. I'd actually make the avocado salsa again & just serve it with chips.

Potato & Chorizo Tacos with Simple Avocado Salsa
(from Mexico One Plate At A Time)

12 oz potatoes, peeled & cut into 1/2-inch cubes (the recipe calls for waxy potatoes but we used russets & it was fine)
salt
12 oz Mexican chorizo
1/4 c onion, finely chopped (the recipe calls for white & we used red)
4 oz tomatillos, husked, rinsed & roughly chopped
1 clove garlic, peeled
1 jalapeno, seeded
1 large ripe avocado, peeled & pitted
12 corn tortillas

Bring a large saucepan of water to a boil. Salt it & add the potatoes. Let cook until tender, about 10 minutes. Drain.

Heat a large skillet over medium then add the chorizo & onions. Cook until the sausage is cooked through, break apart as it cooks. If there is a lot of fat drain it from the pan.

Add the potatoes to the skillet with the chorizo & onions. Cook until the potato starts to brown. Mash everything together a little as it cooks.

Meanwhile, put the tomatillos, garlic & jalapeno in a food processor & pulse until finely chopped. Add the avocado & pulse until everything is blended. Taste for seasoning & add salt if needed.

Serve the chorizo mixture & avocado salsa on the warm corn tortillas.

Makes 12 tacos.

If you are not reading this post in a feed reader or at http://agoodappetite.blogspot.com OR at http://agoodappetite.com then the site you are reading is illegally publishing copyrighted material. Contact me at katbaro AT yahoo DOT COM. All recipes, text and photographs in this post are the original creations & property of the author unless otherwise noted.
© 2007-2010 Kathy Lewinski

Monday, January 25, 2010

Ad Hoc Pan Seared Duck Breast & Weekly Menu

Last night we continued cooking our way through Thomas Keller's Ad Hoc at Home with the Pan Seared Duck Breast.
Beautiful duck skin
We had a whole Peking duck in the freezer which we had bought locally from Highview Pastures in Farmington, MN so, Matt had to butcher it to get the boneless breasts. (We've set the thighs & legs aside to confit later this week.) The butchering was probably the hardest part of this whole dish. After that they get seasoned with salt, pepper, orange zest, nutmeg, thyme, bay & balsamic vinegar. Then they rest in the fridge for up to 12 hours. We let ours rest for about 7 hours, they were nice & dry for cooking.
Seasoned Duck BreastsScored skin
When its time to cook they get cooked on low skin-side down for about 20 minutes until crisp. This renders quite a bit of the fat which we also saved for the confit. The meat-side just get 30 seconds of heat before the whole thing goes in a 400 F oven for 5 minutes. We ended up with some amazing tasting duck, it was tender & juicy. I was really surprised at how much the flavor of just a little orange zest came through.
Searing the duckRemoving the rendered duck fatPan Seared Duck
We served this with the suggested fall/winter side dish, Butter Braised Brussels Sprouts, Kohlrabi & Radish.
#24 - Ad Hoc Pan Seared Duck Breast
A colorful winter dish with great flavor though I have to think I could get something just like it without using 3 pans. I'm not complaining about the way Keller has you cooks things separately & then bring them together in the final dish, I'm just saying for a quick weeknight dinner I'm betting I can get a similar result with less steps. I do have to say its a great way to use radishes & kohlrabi so I will be playing with it more.

On to Menu Planning Monday...

Potato & Chorizo Tacos - From Rick Bayless

Miso Glazed Salmon

Winter BLTs - Using our green tomato jam

Red Beans & Rice

Kale Ravioli

Rösti Casserole with Baked Eggs - From Cooking Light

If you are not reading this post in a feed reader or at http://agoodappetite.blogspot.com OR at http://agoodappetite.com then the site you are reading is illegally publishing copyrighted material. Contact me at katbaro AT yahoo DOT COM. All recipes, text and photographs in this post are the original creations & property of the author unless otherwise noted.
© 2007-2010 Kathy Lewinski

Saturday, January 23, 2010

Corn & Chorizo Chowder

Yesterday, we realized we didn't have anything for lunch, nothing for sandwiches & no soup in the fridge. Matt offered to take me to Rustica for lunch but I figured I could probably throw a soup together from what we had in the house. I knew we had corn in the freezer so I suggested a corn chowder. I put the question out to my foodie friends on Twitter, should I go out or should I make chowder. The overwhelming response was for the chowder as long as I shared the recipe.
Corn & Chorizo Chowder
It was Matt's idea to add the chorizo & bacon we had in the fridge to the chowder. It's good ideas like this that remind me why I married him.
Makings of a Chowder
I have to say I was pretty impressed that we had everything including the fresh herbs on hand for this. The soup smelled & tasted wonderful. Cooking the aromatics in the bacon fat gives them such a great flavor. Then the chorizo adds a hint of paprika & a slight smokiness to the broth. Speaking of the broth, we used our homemade stock that is flavorful enough that we used half stock & half water, you can change this percentage based on how much flavor your stock has. This is a hearty soup that will definitely fill you up at lunchtime.

Corn & Chorizo Chowder

2 sliced good bacon, chopped
2 leeks, white & light green parts sliced
1 c yellow onion, chopped
1 clove garlic, minced
6 oz chorizo, sliced (This is Spanish style chorizo not Mexican. It is smoked & comes in links.)
2 T all-purpose flour
2 russet potatoes, peeled & cut into 1/2-inch cubes
2 c chicken stock
2 c water
1 t fresh thyme, chopped
3 T fresh parsley, chopped
salt
pepper
1 1/2 c milk (we used 2%)
2 c corn, fresh or frozen

In a large heavy soup pot cook the bacon until crisp over medium heat. Move the bacon to a paper towel to drain but leave the fat in the pan. Set the bacon aside.

Add the leeks, onion, garlic & chorizo to the pot. Cook on medium for about 5 minutes. Sprinkle the flour in & cook while stirring for 1 -2 minutes. Add the potatoes, stock & water. Bring to a boil. Reduce heat, cover & let simmer for 10 minutes. Add the thyme parsley plus salt & pepper to taste. Simmer covered for another 10 minutes or until the potatoes are tender.

Add the milk & corn. Simmer uncovered for another 5 - 10 minutes. Taste for seasonings.

5 - 6 servings

If you are not reading this post in a feed reader or at http://agoodappetite.blogspot.com OR at http://agoodappetite.com then the site you are reading is illegally publishing copyrighted material. Contact me at katbaro AT yahoo DOT COM. All recipes, text and photographs in this post are the original creations & property of the author unless otherwise noted.
© 2007-2010 Kathy Lewinski

Friday, January 22, 2010

Jansson's Frestelse

Sometimes the strangest things will lead me to trying a recipe. Matt got the book Make the Most of Your Time on Earthfor Christmas. I was reading through the section on Scandinavia the other day & this dish was mentioned as a standard on the Swedish smorgasbord so then I had to go find out what it was.
20 - Jansson's Frestelse
What I discovered, thanks to recipes on the internets, is that Jansson's Frestelse (or Temptation) is basically a hot dish of potatoes, onions & anchovies. I don't know why but something about that just sounded good to me (maybe its ingrained in my Swedish genes). Matt was a little wary of the whole thing.

We decided to switch out the anchovies to sardines because Matt felt that the recipe was really for larger anchovies that we don't really see around here not the ones in the can. He was afraid the ones in the can would be too salty. Sardines are something we've been wanting to see if we like because they, like other oily fish, are so good for you. (Apparently in Sweden this dish is traditionally made with pickled sprats which is basically a pickled sardine.)
Sardines
I thought the end result was really tasty & different. I like the taste of sardines right out of the can so potatoes & onions can only make them better, right. Matt thought it was just ok but he did eat the whole thing. We needed to add salt to the finished dish which I think the pickled fish would have added if we had them. Perhaps anchovies are the way to go.

Jansson's Frestelse
(adapted from Primordial Soup Kitchen)

2 russet potatoes
1/2 yellow onion, sliced
salt
1 tin sardines packed in oil
1/2 c heavy cream
2 t butter
bread crumbs
pepper

Preheat oven to 400 F.

Peel & finely grate the potatoes. Soak in water for 15 minutes to a couple of hours. Drain & squeeze out as much water as possible.

Butter two 2-cup ramekins. Put 1/4 of the potatoes into the bottom of each ramekin. Top with 1/4 of the onions in each. Sprinkle with a little salt. Layer in the sardines, splitting the tin between the two ramekins. Top with the remaining onions & then potatoes. Pour 1/4 cup of cream into each ramekin. Cut the butter into small pieces & scatter around the top. Cover with bread crumbs, some fresh pepper & a little salt.

Bake for 40 minutes until the potato on top is crispy & brown. Let sit a few minutes before serving.

Serves 2

Update: My mom just called me & said according to her Swedish cookbook lox would be a substitute for the Swedish anchovies as well.

If you are not reading this post in a feed reader or at http://agoodappetite.blogspot.com OR at http://agoodappetite.com then the site you are reading is illegally publishing copyrighted material. Contact me at katbaro AT yahoo DOT COM. All recipes, text and photographs in this post are the original creations & property of the author unless otherwise noted.
© 2007-2010 Kathy Lewinski

Thursday, January 21, 2010

Miso & Barley Soup

Our lunchtime parade of soups continues...
Miso & Barely Soup
Matt has been wanting to make a miso soup for awhile & we finally remembered to pick up some miso at the grocery store. This soup with the addition of barley really appealed to us because we felt the barley would make it a little more filling & it has a lot of nutritional value. We had originally planned to also put some tofu in it but felt it wasn't needed in the end. This soup had a lovely broth. Matt really loved it. I liked it quite a bit but thought perhaps it could have used a touch more miso.

Miso & Barley Soup
(adapted from the New Soy Cookbook)

1 T olive oil
2 large leeks (about 2 cups), sliced, white & light green parts only
2 cloves garlic, minced
1/2 t dried thyme
1/2 c white wine
4 c stock, chicken or vegetable
4 c water
6 shiitake mushrooms, stemmed & chopped
3 large carrots, halved length-wise & cut into 1/2-inch slices
1/2 c pearl barley
4 T red miso
salt
flat leaf parsley, chopped for garnish

In a large soup pot heat the oil over medium-high heat. Add the leeks & onions & sauté for 1 minute. Stir in the thyme & wine & cook until the wine reduces by half. Add the stock, water, mushrooms, carrots, barley & miso. Bring to a boil. Reduce the heat, cover & simmer for 30 - 45 minutes until the barley is tender. Taste & salt if desired. Garnish each bowl with chopped parsley.

5 - 6 servings

If you are not reading this post in a feed reader or at http://agoodappetite.blogspot.com OR at http://agoodappetite.com then the site you are reading is illegally publishing copyrighted material. Contact me at katbaro AT yahoo DOT COM. All recipes, text and photographs in this post are the original creations & property of the author unless otherwise noted.
© 2007-2010 Kathy Lewinski

Wednesday, January 20, 2010

Lamb with Balsamic Sauce

Don't you love a dish that looks like a really special yet takes less than a half an hour to make?
Lamb with Balsamic Sauce
I feel like this is one of those dishes. We had it on a Monday night but I could see making it for a special occasion dinner for two. Maybe it's because I think of lamb as a special treat that I only get at restaurants. Anyway, this is dead simple, you just quickly sear the lamb & then make a red wine & balsamic sauce in the same pan. We really liked the tanginess of the sauce with the slight gaminess of the lamb.

I served the lamb with a side of Kashi 7 Whole Grain Pilaf. I cooked the pilaf according to the directions & then stirred in 1 tablespoon fresh parsley & 2 tablespoons of golden raisins when done. It had a great textured, tasted wonderful with the balsamic sauce & one servings has a days worth of whole grains in it.

Lamb with Balsamic Sauce
(adapted from Cooking Light Jan/Feb '10)

1 t olive oil
4 lamb chops
kosher salt
pepper
1/4 c red onion, chopped
1 clove garlic, chopped
5 T red wine, divided
1 T balsamic vinegar

Heat the olive oil in a nonstick skillet over medium-high heat. Salt & pepper the lamb chops on both sides & put in the pan. Cook on one side for about 3 minutes, until browned. Flip & cook on the second side for 4 more minutes. (This will give you a rare to medium-rare chop, cook longer if you wish.) Remove the chops to a plate & tent with foil to keep warm.
Lamb
Put the onions & garlic in the skillet, cook until the onion is translucent. Add 2 tablespoons of the red wine & bring to a boil. Cook until evaporated. Add the remaining red wine & vinegar boil until reduced by about half. Taste & season with salt if desired.

Serve the sauce over the chops.

2 servings

If you are not reading this post in a feed reader or at http://agoodappetite.blogspot.com OR at http://agoodappetite.com then the site you are reading is illegally publishing copyrighted material. Contact me at katbaro AT yahoo DOT COM. All recipes, text and photographs in this post are the original creations & property of the author unless otherwise noted.
© 2007-2010 Kathy Lewinski

Tuesday, January 19, 2010

Pamonhas de Norte

At our tamale party this weekend one of the guests, Julie, taught us to make these Pamonhas de Norte (Northern Brazil Sweet Tamales) & everyone loved this sweet treat full of corn, coconut, bananas & cinnamon.
Tamale Making
Typically pamonhas are steamed in banana leaves which imparts a green banana flavor to them. Since we were going to be wrapping ours in corn husks Julie added banana to the mixture. The added banana gives them a moister almost pudding-like texture once cooked (though even without the banana these would not get as firm as regular tamales). You could probably get a firmer finished pamonhas by adding some more masa flour to the mix but we didn't get a chance to try that out. These treats made the perfect dessert for our tamale feast. Thanks Julie for sharing these with us!

Pamonhas de Norte (Northern Brazil Sweet Tamales)
(Julie got this from a cookbook years ago & doesn't remember which one)

1/4 c masa flour
1 can creamed corn
1 c shredded unsweetened coconut
1/3 c sugar
1 small banana, mashed
1/4 t cinnamon
pinch of nutmeg
2 T melted butter
splash of dark rum
Tamale Making
Mix all ingredients together. Wrap in corn husks or banana leaves using a strip of the wrapping to tie them into little packages. Steam for 40 minutes. They filling will have a pudding-like texture

Makes about 10 (We had a double batch & got about 24)

If you are not reading this post in a feed reader or at http://agoodappetite.blogspot.com OR at http://agoodappetite.com then the site you are reading is illegally publishing copyrighted material. Contact me at katbaro AT yahoo DOT COM. All recipes, text and photographs in this post are the original creations & property of the author unless otherwise noted.
© 2007-2010 Kathy Lewinski

Monday, January 18, 2010

Weekly Menu 1/18 - 1/23/10

Yesterday Matt & I hosted Cooking Minnesota for a day of making & eating tamales. It's such a fun way to spend a winter afternoon.
Tamale MakingTamale Making17 - Tamale Making
Tamale MakingTamale MakingTamale Making
We made red chile pork & sweet corn tamales which we'd done before (click on the names for links to the recipes). We also did Rick Bayless' green chile chicken filling which was wonderful.
I'll be back later to share the recipe for Northern Brazil Sweet Tamales that one of the other members so generously shared with us.

Now on to Menu Planning Monday...

Lamb Chops with Balsamic Sauce

Janssons Frestelse - Taking a chance & trying out this traditional Swedish dish

Lentil Salad with a Fried Egg

Potato & Chorizo Tacos

Ad Hoc Pan-Roasted Duck Breast with Butter-Braised Brussels Sprouts, Radishes & Kohlrabi

We'll be eating out this week as well at the fabulous Ngon in St. Paul, amazing Vietnamese food!

If you are not reading this post in a feed reader or at http://agoodappetite.blogspot.com OR at http://agoodappetite.com then the site you are reading is illegally publishing copyrighted material. Contact me at katbaro AT yahoo DOT COM. All recipes, text and photographs in this post are the original creations & property of the author unless otherwise noted.
© 2007-2010 Kathy Lewinski

Saturday, January 16, 2010

Pasta with Spinach, Beans & Bacon

Here's a pasta that full of stuff that's good for you, leafy greens & beans, plus has tasty, salty bacon pieces.
Pasta with Spinach, Beans & Bacon
Other than cooking the beans this is a super fast dinner. You could used canned beans but then you wouldn't have the flavorful cooking water to add to the pasta. I recently got a small crock pot at Target for $7 & it's the perfect size for cooking beans. I let them soak for about an hour or so then set the crock pot to low & let the beans cook for about 4 hours. I had perfectly cooked beans with no fuss. My bean were so creamy they added an almost sauce-like texture to the finished dish.

Pasta with Spinach, Beans & Bacon
(adapted from Heirloom Beans)

4 oz tube pasta
2 slices good bacon, cut into large pieces
1 t olive oil
1 clove garlic, minced
4 c spinach (I would just use a whole bunch), if the leaves are large tear them a little
1/2 c dry white beans (we used Yellow Eye beans but any white bean will do), cooked, reserve 1/3 c of the cooking liquid
1/4 t red pepper flakes
2 T toasted bread crumbs
2 T great Parmesan
salt

Cook the pasta according to the directions. Drain when al dente.

Meanwhile, cook the bacon over medium-high heat until crispy. Remove from pan & drain on a paper towel.

Add olive oil to the pan & heat. Add the garlic & cook for about a minute. Pour in a little of the reserved bean liquid & stir scraping any brown bits from the bottom of the pan. Put the spinach in the pan & cook until just wilting. Add the beans, bacon & pasta & mix together. Stir in the remaining bean water. Add the red pepper flakes, bread crumbs & Parmesan. Season with salt.

Serves 2

If you are not reading this post in a feed reader or at http://agoodappetite.blogspot.com OR at http://agoodappetite.com then the site you are reading is illegally publishing copyrighted material. Contact me at katbaro AT yahoo DOT COM. All recipes, text and photographs in this post are the original creations & property of the author unless otherwise noted.
© 2007-2010 Kathy Lewinski

Friday, January 15, 2010

Asian Meatballs Over Peanut Fried Rice

14 - Asian Meatballs Over Peanut Fried Rice
When I saw this recipe last week over on Vanilla Sugar I was really intrigued by it. The idea of meatballs in Asian cooking got me first. Then the mixture of different sauces like black bean & pad thai seemed really interesting as well. I changed very little in the recipe except I left out the water chestnuts & bamboo shoots, substituting carrot for the crunch instead.

This dish was a nice change from the typical stir-fries we tend to make. The meatballs have a great texture & flavor (the ginger flavor is quite strong). the sauces blend together quite well. I really liked the peanut fried rice with the mixture of pad thai & soy sauce, I'd make it again even without the meatballs.

We made all the meatballs (we got 2 dozen) and froze half of them to use later & then made half of the peanut fried rice. This was a good-sized dinner for two. Visit Vanilla Sugar to try this recipe out for yourself.

If you are not reading this post in a feed reader or at http://agoodappetite.blogspot.com OR at http://agoodappetite.com then the site you are reading is illegally publishing copyrighted material. Contact me at katbaro AT yahoo DOT COM. All recipes, text and photographs in this post are the original creations & property of the author unless otherwise noted.
© 2007-2010 Kathy Lewinski

Thursday, January 14, 2010

Southwestern Beef Stew

I had every intention of this meal being a basic beef stew cooked in a crock pot but then I started having ideas of adding sweet potato & beans and it turned a stew with a Southwestern flair.
Southwestern Beef Stew
The seasonings we put in really added that Southwestern flavor.
The Seasoning
This was the first time we've ever used epazote & I can tell you it won't be the last. I had never heard of epazote until Matt wanted to buy it at Penzeys this weekend. According to wikipedia it's "traditionally used with black beans for flavor and its carminative properties, it is also sometimes used to flavor other traditional Mexican dishes as well." It has a wonderful smell especially when mixed together with the Mexican oregano.
Cow Beans
We were really happy with the way this dish turned out. The flavors all blended together so well and create a wonderful gravy without using any stock at all. The beans have a lot to do with that gravy, we used Vaquero beans from Rancho Gordo which have a slightly lighter flavor than black beans (though I think black beans would be a fine substitute). The real key piece in this stew though is the lime juice. That little bit of acidic citrus really makes the sweetness in the sweet potato shine.

All & all a perfect meal on another cold winter night & a nice change from a traditional stew.

Southwestern Beef Stew

1 T canola oil
1 onion (about 5 oz), diced small
2 carrots (about 5 - 6 oz), diced small
2 stalks celery (about 4 oz), diced small
1 jalapeno, seeded & chopped
1 lb stew beef
2 T all-purpose flour
1 c dry Vaquero beans (or substitute black beans)
4 c water
1 t dried epazote
1 t dried oregano (Mexican if you can get it)
1/2 t cumin powder
1 sweet potato (about 12 oz), peeled & cut into 1/2-inch pieces
juice of one lime
salt to taste

Heat the oil in a large skillet over medium-high heat. Add the onions, carrots, celery & jalapeno. Cook until the onions are translucent. Add the beef & cook until browned on all sides. Sprinkle the flour over the meat & vegetables. Cook while stirring for 1 minute.
The basics Browning the Meat
Put the meat & vegetables in a crock pot. Add the beans, water, epazote, oregano & cumin powder. Cook on high for 4 hours or until the beans are tender.

Add the sweet potato. Reduce the heat to low & let cook another 1 1/2 - 2 hours until the sweet potato is tender.
Southwestern Beef Stew
Stir in the lime juice. Taste and add salt if needed.

Makes 5 servings

I did this in a crock pot but you could also easily simmer it on the stove instead. This stew would probably be good served over some rice though it doesn't need it.

If you are not reading this post in a feed reader or at http://agoodappetite.blogspot.com OR at http://agoodappetite.com then the site you are reading is illegally publishing copyrighted material. Contact me at katbaro AT yahoo DOT COM. All recipes, text and photographs in this post are the original creations & property of the author unless otherwise noted.
© 2007-2010 Kathy Lewinski

Wednesday, January 13, 2010

Cooking Ad Hoc - Chicken Pot Pie

When Matt & I saw all the good things in Thomas Keller's Ad Hoc at Homewe decided to cook our way through it. If you've ever looked at a Thomas Keller recipe you know they can be a little intense for the home cook (Lisa over at Left Coast Cowboys claims even his dressings have to be strained through a chinois sixteen times and involve the simultaneous efforts of five sous chefs) . This book is touted to be his "accessible" cookbook so we'll see how this pair of home cooks does. We started this week with Chicken Pot Pie.
11 - Thomas Keller's Chicken Pot Pie
I stuck pretty close to the recipe except for a few things. It called for the carrots, potatoes & pearl onion to each be boiled separately with thyme, peppercorns & bay leaves. I understand this was to cook them each to their perfect tenderness but I couldn't be bothered & cooked them all together.
Thomas Keller's Chicken Pot Pie
The bechamel sauce was supposed to be strained through a cone-shaped fine mesh strainer before adding the thyme, parsley & cayenne. My bechamel was very smooth so I didn't bother with this step either (plus I don't own a cone-shaped fine mesh strainer).
Thomas Keller's Chicken Pot Pie
This is actually a twofer because I also made the Basic Pie Crust recipe from Ad Hoc. I have to say I'm pretty proud of how that crust turned out, beautiful & flaky. I did have to add a little more water than was called for but it is quite dry here right now.
Thomas Keller's Chicken Pot Pie Thomas Keller's Chicken Pot Pie
Matt said this was the best pot pie he'd ever had. The sauce was very thick creating a very solid pie, you could almost pick it up & eat it with your hands. It was extremely filling. I made half of the recipe & made two small pies. The recipe says this is 3 servings but really for us it was 4 .
Thomas Keller's Chicken Pot Pie
What I learned? That I can make a really good, flaky pie crust & to start the bechamel while you are cooking the vegetables or you'll be waiting for it to reduce at the end with a really hungry husband hovering around.
Will we make it again? Definitely.

If you are not reading this post in a feed reader or at http://agoodappetite.blogspot.com OR at http://agoodappetite.com then the site you are reading is illegally publishing copyrighted material. Contact me at katbaro AT yahoo DOT COM. All recipes, text and photographs in this post are the original creations & property of the author unless otherwise noted.
© 2007-2010 Kathy Lewinski

Tuesday, January 12, 2010

Pork Tenderloin with Pears

It's time to look at another recipe from the latest issue of Bon Appetit...
IMG_0163_2
This is one of those dishes that looks pretty fancy on the plate but really doesn't take much time to make at all. It does though take longer that the recipe calls for, actually twice as much. I feel like perhaps something was missing in the writing of the recipe, I don't see how a tenderloin could be cooked in only 10 minutes our took 20 to reach 145 F (& yes, our oven temp was correct). Then it called for an oven-proof skillet yet the skillet never goes in the oven, strange.

Anyway, the final result was really good & I liked the used of pears instead of the typical apple & pork combination. It feels very seasonal. My one complaint was that I didn't care for the texture of the pear skin, perhaps my pears were a little overripe. It didn't bother Matt at all though & he loved this dish. The sauce was very good & we liked the pear flavor though we wish we could find pear nectar that wasn't mostly water & high fructose corn syrup.

Pork Tenderloin with Pears
(adapted from Bon Appetit Jan '10)

1 1/2 T olive oil
1 garlic clove, minced
1 1/2 t fresh thyme, chopped
1/2 - 3/4 lb pork tenderloin
2 large shallots, peeled & quartered
2 pears, unpeeled, quartered & cored
3 t salted butter, at room temperature
1 1/2 t all-purpose flour
1 c chicken broth
1/2 c pear nectar

Preheat the oven to 475 F.

Mix the olive oil, garlic & thyme together. Smear it all over the pork, shallots & pears.

Heat a large skillet over medium-high heat. Add the pork & shallots. Brown the pork on all sides. Remove the shallots dish & set aside. Put the pork into a baking dish & into the oven. Do not wash the skillet. Roast the pork until 145 F, about 20 minutes. Let rest a few minutes before slicing.

Meanwhile, put the pears into the skillet used to cook the pork over medium-high heat. Cook until brown on the cut side. Remove from the skillet, tent to keep warm & set aside.

Mix the butter & flour together. Add the chicken broth, pear nectar & butter/flour mixture to the same skillet. Bring to a boil, scraping up any bits stuck to the bottom. Boil until thickened.

Slice the pork. Put on a place with the pears (if the pears have gotten cold you may want to heat them in the sauce briefly) & shallots. Top with the pan sauce.

2 - 3 Servings

If you are not reading this post in a feed reader or at http://agoodappetite.blogspot.com OR at http://agoodappetite.com then the site you are reading is illegally publishing copyrighted material. Contact me at katbaro AT yahoo DOT COM. All recipes, text and photographs in this post are the original creations & property of the author unless otherwise noted.
© 2007-2010 Kathy Lewinski
Related Posts with Thumbnails

Get Email Updates!

Enter your email address:

Delivered by FeedBurner

Measurement Abbreviations

T = Tablespoon
t = teaspoon
c = cup
lb = pound
oz - ounce

Labels

Blog Archive

Contributors

Blog Directory for Minneapolis, Minnesota