Saturday, January 31, 2009

Making Mozzarella At Home

For Christmas we received a Mozzarella kit from Leener's. We had heard it was quite easy to make but I have to admit I was a little skeptical. Well, I was so wrong, making mozzarella was super easy to make & the results were wonderful! You just have to have a little patience to let the milk heat slowly & in an hour you are eating your own fresh cheese!
Checking Temperature
First you ripen 1 gallon of milk with a bit of citric acid, lipase, and calcium chloride. Slowly heating over medium heat to 88 F, stirring from time to time.
Stirring
Once the milk reaches 88°F, you add rennet and continue heating to 105 F. Only stir gently every couple of minutes so you don't break up the curd too much.
Starting to coagulate
By the time it reaches 105°F, it will start to look at little chunky. At this point, turn off the heat and let it sit for 20 minutes.
Fully coagulated
After resting for 20 minutes you'll be rewarded with a big chunk of cheese curds.
Draining the curds
Remove the curds with a slotted spoon, leaving the whey in the pan.
Squeezing the curds
Lightly smash the curds with a spoon to squeeze as much whey out of them as possible, then drain. Microwave for 60 seconds and repeat, adding a bit of salt. Microwave again so it reaches 140-150°F, and start kneading the hot cheese with the spoon to help even the heat out.
Kneading with spoon
Continue kneading with a spoon until the cheese pulls together into a ball and sticks to the spoon.
Making mozzarella
At this point you will have a soft mozzarella ball. You can stop at this point.
#23 - Making mozzarella
Or you can stretch & pull it like taffy until you have a cooled firmer cheese better for grating & such.
French Bread Pizza
Now you can enjoy your own homemade cheese. We made a baguette earlier in the day. Split it in half & topped it with some homemade pizza sauce, a few sliced of pepperoni & then our cheese. Perfection!

Friday, January 30, 2009

Dark Chocolate Azteca Cupcakes with Cinnamon Buttercream

With all the cold, snowy, icy weather a lot of you are struggling through this week I thought I'd make a cupcake that would warm you up a little.
Dark Chocolate Azteca Cupcake with Cinnamon Buttercream
This dark chocolate cupcake is flavored with ancho for a nice chile flavor & cayenne for a bit of heat. After you mix the batter test it for heat. If it seems subtler than you wish or just where you want it add a little more cayenne, as it will lessen a little more during baking. I've also added cinnamon to the cupcake & frosting as that is traditional is Mexican chocolate.
This morning's baking
I love that dark chocolate color!

Dark Chocolate Azteca Cupcakes with Cinnamon Buttercream

1/4 c unsalted butter
2 T Hershey's Special Dark Cocoa Powder
3 T water
1/2 c granulated sugar
2 T well beaten egg
2 T buttermilk
1/2 T vanilla
1/2 c all-purpose flour
1/8 t baking soda
1/4 t baking powder
1/4 t cinnamon
1/4 t ancho chile powder
1/8 t or more of cayenne depending if you like some heat
pinch of salt

Preheat oven to 350 F. Prepare 5 - 6 muffin tins.
Melt butter in a large heavy saucepan over moderately low heat, then whisk in cocoa. Add water and whisk until smooth. Remove from heat. Whisk in separately sugar, egg, buttermilk, and vanilla. Sift flour, baking soda, baking powder, cinnamon, ancho, cayenne and salt into the cocoa mixture and whisk until just combined (it will be a little bit lumpy).

Fill muffin tins to about 2/3 full for rounded cupcakes. Bake for 20 minutes until a skewer or toothpick comes out clean. It's a moist cake, so don't worry if a few crumbs stick to your tester.
Allow cupcakes to cool.

Cinnamon Buttercream

1/2 c unsalted butter, at room temperature
1 c powdered sugar
1/2 t cinnamon
dash of vanilla
pinch of salt

Beat the butter until light & creamy. Beat in 1/4 c of sugar, cinnamon, vanilla & salt until combined. Continue to add the sugar 1/4 c at a time. Taste & add more cinnamon if you wish.

Makes 5 - 6 cupcakes

I'm submitting this to the Cinnamon Celebration over at A Southern Grace. You have never met anyone who loves cinnamon as much as Grace!
cinamon

Wednesday, January 28, 2009

Daring Bakers - Tuile

This month's challenge is brought to us by Karen of Bake My Day and Zorra of 1x umruehren bitte aka Kochtopf. They have chosen Tuiles from The Chocolate Book by Angélique Schmeink and Nougatine and Chocolate Tuiles from Michel Roux.
Chocolate Tuile Cup with Gelato
I chose to make my tuile into little cups to serve my homemade gelato (We were supposed to serve it with something light & I figured since my gelato has no egg in it, its lighter than normal). Since the gelato is vanilla I flavored the whole tuile dough with dark chocolate cocoa. I didn't really have anything to use as a stencil to shape the tuile circles before baking so I winged it & cut a 6" circle out of the piece of card stock.
Tuile Stencil Making Tuile Circles
I wasn't exactly sure how thick to spread out the dough but from what I've seen it should be pretty thin. I don't have an offset spatula so this was a little tricky with a kitchen knife. The second question was how long to cook them, the recipe says until the edges are golden brown but I couldn't really tell that with the chocolate dough. I guessed they were cooked when the dough looked set. I had a little bit of a tricky time with the shaping & they did crack in a few spots but not badly at all. Everything crisped up nicely except the bottoms of the cups. I think the center of my circles may have been a little thicker than the rest.
Shaping Tuile Cups
I also made some curls around a pen which we ate right away. The chocolate flavor was so good.
Tuile Curls
My only disappointment with these was how quickly they went soft. I made them after lunch, let them cool & put them in an airtight container. By dessert they were all ready chewy instead of crisp though they did retain their shape & the flavor was still great.
Chocolate Tuile Cup with Homemade Gelato
Following is the recipe taken from a book called “The Chocolate Book”, written by female Dutch Master chef Angélique Schmeinck, I have adapted it but cutting the recipe in half & making the whole thing chocolate flavored.

Tuile

Yields: I got 2 6" circles & 3 curls with my half batch
Preparation time batter 10 minutes, waiting time 30 minutes, baking time: 5-10 minutes per batch

2 T softened butter (not melted but soft)
1/4 c sifted confectioner’s sugar
a dash of vanilla extract
1 large egg white (slightly whisked with a fork)
1/4 c sifted all purpose flour
1/2 table spoon cocoa powder (I used Hershey's Special Dark)
Few drops of water

Preheat oven to 350 F

Using a hand whisk or a stand mixer fitted with the paddle (low speed) and cream butter, sugar and vanilla to a paste. Keep stirring while you gradually add the egg whites. Continue to add the flour in small batches and stir to achieve a homogeneous and smooth batter/paste. Be careful to not overmix. Mix in the cocoa & a few drops of water.

Cover the bowl with plastic wrap and chill in the fridge for at least 30 minutes to firm up. (This batter will keep in the fridge for up to a week, take it out 30 minutes before you plan to use it).

Line a baking sheet with parchment paper or a silicone mat and chill in the fridge for at least 15 minutes. This will help spread the batter more easily if using a stencil/cardboard template such as the butterfly. Press the stencil on the bakingsheet and use an off sided spatula to spread batter. Leave some room in between your shapes.

Bake shapes in preheated oven for about 5-10 minutes or until the edges turn golden brown (mine took about 7 minutes). Immediately release from bakingsheet and proceed to shape/bend the cookies in the desired shape. These cookies have to be shaped when still warm, you might want to bake a small amount at a time or maybe put them in the oven to warm them up again. Or: place a bakingsheet toward the front of the warm oven, leaving the door half open. The warmth will keep the cookies malleable.

If you don’t want to do stencil shapes, you might want to transfer the batter into a piping bag fitted with a small plain tip. Pipe the desired shapes and bake. Shape immediately after baking using for instance a rolling pin, a broom handle, cups, cones….

Pork Tenderloin with Mostarda Di Frutta

The other day we were watching an episode of Diary of a Foodie where they were preparing Smoked Pork Loin. The pork looked really great but I was really intrigued by the Italian condiment, Mostarda Di Frutta, that was made to serve with it. Since we're luck to hit 0 degrees these days we aren't smoking any pork on the grill but I thought the mostarda would work just has well with a piece of pork roasted in the oven.
Pork Tenderloin with Mostarda Di Frutta
We had a pork tenderloin in the freezer so we went with that as our cut of meat. This is a favorite cut of pork for us because it roasted up so quickly & is really versatile. The original recipe for the mostarda called for a mixture of 5 dried fruits; raisins, peaches, figs, mangos & apricots. Since I had golden raisins, cherries & apricots on hand that was the mixture we went with. Let me tell you that was a good choice, those Michigan sour cherries were the perfect foil for that strong mustard flavor.

This dish is going in the make-it-again file for sure! Not only does it taste wonderful but it looks fabulous too. Matt is really interested in trying the mostarda this summer with grilled pork & chicken.

Roast Pork Tenderloin with Mostardo Di Frutta
adapted from Gourmet Magazine June '08

1 lb pork tenderloin
salt & pepper
1 c + 2 T water
6 T dry mustard
1/4 c white vinegar
2 T packed brown sugar
1/2 T fresh ginger, minced & peeled
1 c dried fruit (our mix was apricots, golden raisins & cherries)

Preheat the oven to 400 F.

Season the pork all over with salt & pepper. Place in a roasting pan & roast for about 30 minutes for medium.

While the pork is cooking, whisk the dry mustard into the water. In a small saucepan bring the vinegar, sugar & ginger to a boil. Stir until the sugar is dissolved. Reduce the heat to simmer & let reduce a little, about 6 minutes. Chop any of the fruit that is rather large, we only chopped the apricots. Stir in the mustard water & the fruit. Bring to a simmer & let thicken, about 10 minutes. If the sauce gets thick thin it out with a little water.

When the pork is cooked, remove from the oven & let rest for 5 minutes. Cut into slices & serve with the Mostarda.

3 Servings

We served this with a side of rice & the mustarda was great mixed in with the rice as well. Our other side was sautéed shallots & kale. A lovely Monday night meal!

Tuesday, January 27, 2009

Black Bean & Squash Chili

Chili is one of those winter fallback dishes for us. We usually have stuff on hand to throw one version or another together & really they don't take that long to whip up. Plus a big steaming bowl of chili is so perfect for cold winter nights.
Black Bean & Squash Chili
I was inspired to add squash to this batch of chili by Lori's Lipsmaking Goodness. I thought the sweetness of the squash would be a nice counterbalance to the other chili ingredients. To that we added a lot of our typical chili seasonings & used beer as a good portion of the liquid since we love the deep flavor it adds.

This was a pretty darn good chili but I was disappointed that the flavor of the squash didn't come through more. I think the problem might have been that I used delicata squash (because I had one one hand) & it tends to be delicately flavored. A butternut or acorn squash would probably have a flavor that stood out a little better.

Black Bean & Squash Chili

1 1/2 c dried black beans, sorted
1 T olive oil
2 c winter squash, peeled, seeded & chopped small
1 c red onion, chopped
4 shallots, chopped small
6 oz beer
1 large can whole tomatoes
1 c + chicken broth
1/2 t cumin
1/2 t dried oregano
1/2 t ancho powder
big pinch of salt
pepper

About 2 hours before making the chili, put the beans in a large pot & cover with boiling water. Cover the pot & let sit until you are ready to put them in the chili, the beans should be about twice their size. Drain.

In a large heavy pot heat the oil over high heat. Add the squash, onions & shallots. Cook until everything starts getting brown & caramelized. Pour in the beer & use it to deglaze the bottom of the pan. Stir in all the remaining ingredients & the beans. Add enough chicken broth to just cover the everything. Bring to a boil. Cover, reduce heat & cook until the beans are tender about 1 hour.

Top with sour cream if you wish.

3 servings.

Monday, January 26, 2009

Weekly Menu 1/26 - 1/31/09

Another arctic blast blew through this weekend so what did we decide to do? We try out the new ice cream maker.
Homemade Gelato
We got the KitchenAid KICA0WH Ice Cream Maker Attachment for Christmas & it worked like a dream. For this first go I went with a very basic vanilla gelato recipe (just cream, milk, sugar & vanilla) that I found in The Ice Cream Bible.
Homemade Gelato
It was heavenly. Now I can't wait to try other flavors & add-ins.

On to Menu Planning Monday....

Black Bean & Squash Chili - inspired by the one at Lori's Lipsmaking Goodness

Chicken & Potato Hotdish - I forgot how much I love hotdish until I made one last week. This will be my poultry spin on hotdish

Shrimp & Beet Pasta - I just have a feeling that the flavor of roasted beets & shrimp will go together nicely, Matt is dubious.

Steak Sandwiches with Horseradish Root Vegetable Mash - I've got all this fresh horseradish & root vegetables so this seems like a perfect us.

Roast Pheasant with Wild Rice - This was the amazing dinner my sister's mother-in-law served us on Christmas. We were lucky & my brother gave us some pheasant he shot so we can try making it ourselves.

Pork Chops with Celeriac Gratin - This meal is again about the side dish & finding a good uses for celeriac.

I haven't figured out my cupcake flavor for the week yet so you'll have to wait until Friday to find out.

Saturday, January 24, 2009

Penne with Skillet-Roasted Root Vegetables & CSA box #19

When I saw this recipe from Bon Appetit on Serious Eats I thought what a great way to use some of those root vegetables I've been getting from the Farm.
Penne with Skillet-Roasted Root Vegetables
This was a wonderful meal. I was so surprised at the great sweet, caramelized flavor the vegetables got cooking on the stove instead of the oven (I think the trick was to chop them relatively small). The red beets gave the whole thing a slightly reddish hue but I think it actually looked pretty.

I did make some adaptations to the original recipe. I changed up the vegetable mix, they used golden beets, sweet potato & parsnips, I think you could use an root vegetables you have on hand. The recipe called for using the beet green if you have them. Since I cut the greens off the beets to store them (they keep longer this way) I didn't have any but what I did have was kale. Kale is not as tender as beet greens so I added it while the vegetables cooked in the broth to soften. I also added white wine to the recipe because I thought it would add a nice flavor when used to deglaze the pan. This is one I'll definitely make again!

Penne with Skillet-Roasted Root Vegetables
adapted from Bon Appetite Jan '09

1 T olive oil
1 c red onions, roughly chopped
3 c mixed root vegetables, chopped (we used beets, turnips & parsnips)
1 T fresh rosemary, chopped
1/4 c white wine
3/4 c chicken broth + more if needed
1 c kale leaves, stems removed, ripped into pieces
8 oz penne pasta
1 T butter
3/4 c grated parmesan

Heat the oil in a large skillet over high heat. Add the onions & root vegetables. Cook for about 9 minutes until the vegetables start to brown & soften, stirring occasionally. Stir in the rosemary & cook for another minute. Pour in the white wine & scrap off any brown bits on the bottom of the pan. Add the chicken broth & kale. Cover & turn heat to medium. Let cook for about 15 minutes until the vegetables are very tender.

Meanwhile, cook the penne according to the package directions. Drain. Return the pasta to the pot & stir in the butter & most of the cheese. Stir in the vegetables. If the pasta seems to dry add a little more chicken broth.

Serve with remaining cheese sprinkled over the top.

2 large servings

This week was our last CSA box for the year. Lots more wonderful root vegetables that will store for at least a couple weeks. We also got some beautiful dried peppers.
What's in CSA box #19
It'll be strange not getting a box of vegetables every two weeks anymore. We've gotten so used to having that bounty in our house. We will be signing up for next season with Harmony Valley Farm. We've so enjoyed the variety we received from them this year & the number of new things we've been able to try. I think a few of my readers are also members of HVF so, if you are please leave a comment I'd love to know.

Friday, January 23, 2009

Pineapple Meringue Cupcakes

Don't you just love it when an experiment goes right? These cupcakes topped with meringue were a total experiment & I'm thrilled with the result.
Pineapple Meringue Cupcake
We always have frozen fruit on hand for our morning smoothies but they can also be a great for baking. It's been so cold here lately I decided to use some of our frozen pineapple to bring a little tropics into our life, well into our kitchen anyway. I wanted to do a meringue topping so it would be almost like a pineapple meringue pie. I started thinking why couldn't I just bake the meringue on the cupcake like you would a pie. What do you know it worked!
Pineapple Meringue Cupcake
The cupcake itself was really good with a wonderful pineapple flavor. The meringue topping was super easy to make & you put it on the cupcakes part way through baking. I really like baking cupcakes but making & applying frosting is not my favorite part so, having a cupcake that comes out of the oven frosted & ready to eat, sign me up. I probably could have done a neater job putting the meringue on but I rushed worrying it would melt on the hot cupcake. It actually didn't so next time I'll spend more time on the presentation. Hmmm....a key lime meringue cupcake....

Pineapple Meringue Cupcake

Pineapple Cupcake

2 T unsalted butter, at room temperature
1/4 c + 1 T sugar
1 egg, separated
1/8 t vanilla
1/2 c + 1 T all-purpose flour
1/2 t + 1/8 t baking powder
pinch of salt
1/4 c milk
1/4 c frozen pineapple, chopped (no need to thaw)

Meringue Topping

1 egg white
1/8 t cream of tarter
1 T sugar
few drops vanilla

Preheat oven to 350 F. Prepare 4 muffin tins.

In a bowl cream the butter, sugar, egg yolk & vanilla until light & fluffy. Beat in 1/4 c of the flour, baking powder & salt. Beat in the milk. Beat in the remaining flour.

In a small bowl beat the egg white until stiff peaks form. Fold a small amount of the egg white into the batter. Fold in the remaining egg white until completely incorporated. Fold in the pineapple.

Fill the muffin tins 2/3 full. Bake for 15 minutes, the top should just be setting.

While the cupcakes are baking make the meringue. Beat the egg white until foamy. Add the cream of tarter, sugar & vanilla. Beat until you get still shiny peaks.

When the cupcakes have baked for 15 minutes take them out of the oven. Use a knife or spatula & divide the meringue topping between the cupcakes. Use your knife to pull up & make peaks.

Return to the oven & bake for another 10 minutes. The meringue should be golden brown.
Out of the oven
Let cool for a little bit in the muffin tins before removing. Cool on a rack & store in the refrigerator.

Makes 4 cupcakes.

Thursday, January 22, 2009

Roasted Red Pepper & Black Bean Soup

Last week we opened a jar of roasted red peppers to make Smoky Sausage & Rice Soup & a can of chipotle in adobo to make Shortcut Tacos al Pastor. So I knew when I was coming up with this weeks menu I wanted to make something that would use both of those things. We also had a ton to dried black beans on hand from our last CSA delivery. I decided these would make a fabulous soup together.
Roasted Red Pepper & Black Bean Soup
I wanted the roasted red pepper to be the star of the broth of this soup instead of making a a black bean soup with some red peppers in it. The chipotle in adobe added a fabulous flavor & scent to the soup though be careful it also adds a lot of heat. Using dried beans instead of canned means they didn't get all mushy in the soup & added a nice texture.

Roasted Red Pepper & Black Bean Soup

1 c dried black beans
1/2 T olive oil
1 c red onion, roughly chopped
2 cloves garlic, chopped
8 oz roasted red pepper, roughly chopped (about 2 cups)
1/2 - 1 chipotle pepper in adobe (more or less according to the heat you like)
1/2 t dried oregano
1 cup loosely packed fresh parsley, chopped
salt
2 c chicken broth
sour cream

Pick through the beans for any stones & place in a pot with a lid. Cover with boiling water about 1 inch above the beans. Let sit until twice in size, at least an hour or two.

In a soup pot heat the olive oil over medium-high heat. Add the onion & garlic & cook until very tender. Stir in the peppers, oregano, parsley & a good pinch of salt. Cook or about 5 minutes, stirring occasionally. Add the chicken broth. Using a blender or immersion blender process until smooth.

Stir in the soaked beans & bring to a boil. Cover & reduce heat. Simmer for about 1 hour or until beans are tender. Use a fork to smash some of the beans if you wish to thicken it a bit more.

Serve with a dollop of sour cream or plain yogurt.

2 main dish servings

Tuesday, January 20, 2009

Chicken Tagine with Squash & Chickpeas

I don't know about you but we are glued to the TV this morning watching the Inauguration. What an exciting day for the US, its wonderful to see people so full of hope.

Ok, on to the food....

We got quite a few cookbooks for Christmas & our goal right now is to try to cook from at least one of them each week. This week we chose a recipe from A Platter of Figs and Other Recipes
by David Tanis. I really like how this cookbook (and Jamie Oliver's Jamie's Kitchen) is set up into recipes to cook by season, especially since we to tend cook a little more seasonal with our CSA. This tagine was appealing to us for its North African spices & the fact we had almost everything in it on hand.
Chicken Tagine with Squash & Chickpeas
Other than sizing the recipe way down (we don't t need 8-10 servings around our house) there were only two major changes I made to the recipe.  First, I used canned chickpeas instead of soaking dried ones. I did this because we had the canned one & we like the flavor of the canned  ones better.  Using canned chickpeas meant they needed  to simmer in seasoning for much less time then called for to get tender. The other major change was the cut of the chicken, it called for whole legs with the thighs but I couldn't find those so I just used thighs.

I  have to say we weren't blown away by this dish. The chicken itself was wonderful, moist, tender & flavorful, but the rest of the dish was bland.  We were quite surprised by this. Perhaps we needed to add more harissa oil to each serving though I thought it was already a little greasy, maybe I should have ladled off more fat during the cooking. I think this recipe is worth playing around with & improving on. One thing I will do for sure next time is add less water to the pot before putting it into the oven. The chickpeas water wasn't enough to cover the chicken so I added a little more now I don't think it was completely necessary for the chicken to be covered.

Chicken Tagine with Squash & Chickpeas
adapted from A Platter of Figs

For the chickpeas:
1 14oz can chickpeas, drained & rinsed
5 c water
1/2 onion cut into 4 large pieces
1 cinnamon stick
6 whole cloves
1 T olive oil
salt
butter
pinch of ground cinnamon

For the tagine:
1 lb of winter squash, peeled, seeds removed & thickly sliced (we used a festival squash)
salt & pepper
2 chicken thighs, bone-in with skin
1-inch piece ginger, peeled & grated
1/2 t cumin seeds, toasted & roughly ground
1 large onion, diced
1 T olive oil
1 T butter
2 cloves garlic, peeled & sliced
pinch of saffron
red pepper flakes

Put the chickpeas, water, onion, cinnamon stick, cloves, olive oil & a pinch of salt into a saucepan. Bring to a boil then simmer uncovered for 15-20 minutes. The chickpeas should be very tender. Set aside.

Preheat oven to 400 F.

Season the squash with salt & pepper. Season the chicken with salt & pepper then massage it with the grated ginger. Sprinkle with the ground cumin seeds.

Heat the olive oil & butter in a skillet over medium-high heat. Add the onions & cook until golden brown, about 10 minutes. Remove from the heat & add the garlic, saffron & red pepper flakes.
Chicken Tagine with Squash & Chickpeas
Layer the onions on the bottom of a shallow wide casserole dish or dutch oven. Top with the squash slices. Place the chicken on top in a single layer with the skin up. Add the cooking liquid from the chickpeas until chicken is barely covered. Cover, place in the oven & cook for 30 minutes.

Reduce heat to 375 & cook 30 minutes more. Remove the lid, if there is a lot of surface fat ladle it out. Put back into the oven & cook 20 more minutes until the chicken is lightly browned.

Warm the chickpeas back up. Drain. Add a dab of butter & a pinch of salt to them.

Serve the tagine with the chickpeas.

4 servings

The book suggested serving the tagine with this harissa oil.

Harissa Oil

1/2 T cumin seeds
1/2 T coriander seeds
1/2 t caraway seeds
1/2 t fennel seeds
1 1/2 T sweet paprika
1/2 t cayenne
1 garlic clove
1/2 t salt
1/2 c olive oil
few drops red wine vinegar

Toast all the seeds in a skillet until fragrant. Grind.

Mash the garlic with the salt into a paste.

Mix all ingredients together. WIll keep for a week in the fridge.

Monday, January 19, 2009

Weekly Menu 1/19 - 1/24/09

Are we done with this cold yet?! Seriously we were hitting -40 F with windchill this past week. 
Snow Day
I know, what do I expect living in Minnesota. It was a great week for staying inside & getting lots of crafting done & cooking some good meals. This week should be a little less harsh, hopefully...Chicken Tagine with Chickpeas - From A Platter of Figs
Roasted Red Pepper & Black Bean Soup
Hotdish
French Bread Pizza - With our own French bread & homemade mozzarella
Pork Loin with Mostarda di Frutta
Ziti with Skillet-Roasted Root Vegetables - From Bon Appétit

For this week's cupcake I'm planning a little tropical twist to warm things up with a Pineapple Cupcake.
Last Monday I talked about the Minneapolis hamburger specialty, the Ju(i)cy Lucy. This weekend we went over to The Blue Door Pub in St. Paul to try their gourmet take on these yummy stuffed burgers, the Blucy#18 - The Luau Blucy
I had the Luau Blucy. A burger stuffed with mozzarella & pineapple then topped with Canadian bacon. Throw in a side od beer battered green beans & doesn't that look decadent.
The Cajun Blucy
Matt had the Cajun Blucy which was stuffed with pepper jack cheese & jalapeno. We were tempted by so many of their Minnesota State Fair style sides, fried Spam bites, fried cheese curds & fried pickles (yeah we like our food fried here). We'll definitely be heading back to the Blue Door to try the rest of their nine Blucys.

Saturday, January 17, 2009

Curried Lentil Soup

Not only did Matt pick last night's meal but he also cooked it. I had been busily working on a project all day in my little studio & when I came downstairs to suggest we make quesadillas I discovered this wonderful meal already on the stove.
Curried Lentil Soup
The original recipe called this a stew though we thought of it as more of the thick soup. Using a good curry powder is really important in this dish as it is the main flavor for the broth, which we really loved. We have a lot leftover for lunches & I'm betting it will thicken up a little more as the lentils absorb more of the broth. I'm also betting that this is a dish that will taste even better the next day.

As I was smelling this cooking all I could think of was I want golden raisins with that smell so I went ahead & added a handful to my bowl. I thought that little touch of sweetness was a perfect addition.

Curried Lentil Soup
Adapted from Real Food for Real People

2 T olive oil
2 carrots, peeled & finely chopped
2 ribs celery, finely chopped
1 medium onion, finely chopped
2 cloves garlic, minced
2 T curry powder
5 c water
1 1/2 c dried lentils
3 chicken bouillon cubes
1.5 - 2 c tomato purée
8 oz frozen spinach (we actually used some mixed greens I froze this summer)
salt & pepper
golden raisins (optional)

In a large soup pot heat the oil over medium-high heat. Add the carrots, celery & onion. Sauté until just getting tender. Add the garlic & curry powder. Cook while stirring for 2 to 3 minutes.
Vegetable Quilt
Add 1 cup of the water & scrap the brown bits off the bottom of the pan. Add remaining water, lentils & bouillon. Place a cover on the pot leaving it slightly ajar & bring to a boil. Reduce the heat & simmer for 30 minutes stirring from time to time.
Curried Lentil Soup
Check to see if the lentils are done. When they are tender add the tomato & spinach. Simmer for about 10 more minutes. Salt & pepper as needed.

Sprinkle golden raisins on each serving is desired.

6 - 8 servings

Friday, January 16, 2009

Cherry Chip Cupcakes

When I was a little girl I always thought the most tempting cake mix on the shelves of the grocery store was the Cherry Chip. That pale, pink cake with those sweet, bright pink flecks in it, what little girl could resist. I know now as an adult that there was no cherry in those cupcakes at all instead there is something called cherry flavored pieces (pieces of what I'm not sure). So, I decided to use some of the dried cherries I got for Christmas to create my own Cherry Chip Cupcakes.
Cherry Chip Cupcake
Now these don't have the hot pink flecks of the store bought mix but the chopped cherries add a great flavor to each bite. I added a little pink food coloring to make them a little girlie but you can totally leave that out & just have a white cake.
Cherry Chip Cupcakes
I had planned on frosting these with a vanilla bean buttercream but after we tasted one without frosting we decided a cream cheese frosting would be even better.

Cherry Chip Cupcake
(adapted from Martha's Stewart Coconut Cupcake)

1/4 c dried cherries, chopped
3/4 c all-purpose flour
1/2 t baking powder
1/4 t salt
6 T unsalted butter, room temperature
1/2 c + 1 T  sugar
1/4 vanilla bean
1/2 t vanilla
1/4 c buttermilk
pink food coloring (optional)
2 large egg whites


Preheat oven to 350 F. Prepare 6 - 8 muffin tins.

Place chopped cherries in a bowl & cover with very hot water. Let sit for 10 - 15 minutes to soften. Drain & set aside.
In a small bowl mix together the flour, baking powder & salt. 
In a large bowl cream together butter & sugar until light & fluffy. Scrape the seeds from the vanilla bean & add to butter mixture. Add vanilla & beat. On low speed, add half the flour mixture until just blended. Add milk until blended. Add remaining flour & mix until just blended. Blend in food coloring if you wish.
In another bowl beat the egg whites until stiff, glossy peak appear, about 2 minutes. Gently fold 1/3 of the egg into the batter until combined. Add remaining egg & fold until combined. Fold in the chopped cherries.
Divided equally among the muffin tins. Bake for 20 minutes or until a toothpick inserted into the center comes out clean.
Allow to cool before frosting.

Cream Cheese Frosting

3 oz cream cheese
2 T unsalted butter, at room temperature
1/2 c powdered sugar
1/4 t vanilla

Blend the cream cheese & butter together until light & fluffy. Bend in sugar & vanilla.

Makes 6 -8 cupcakes


Thursday, January 15, 2009

Crock Pot Cassoulet

Are we the only ones out there who go through each new Williams-Sonoma catalog like it was a cooking magazine? We often find recipe ideas in it or links to them on their website. This cassoulet is one of those.
Thomas Keller's Crock Pot Cassoulet
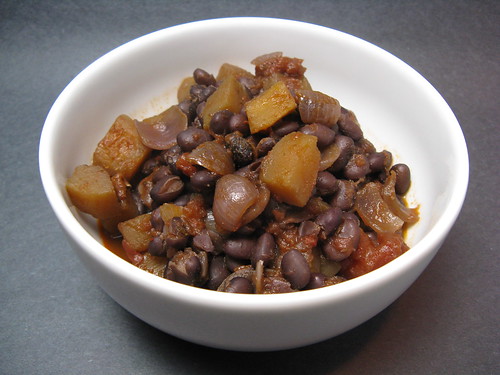
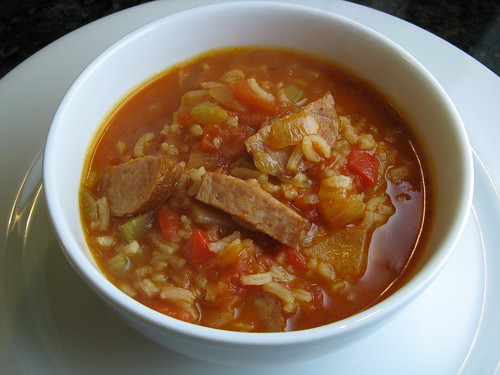
A cassoulet is rustic stew of white beans & meat that have been slow cooked. It seems like the crock pot is the perfect cooking tool for this dish. The recipe from Williams-Sonoma is adapted from one by Thomas Keller of The French Laundry so I figure it had to be good. It is a bit of a modern take on the French classic with its use of Spanish chorizo & Japanese panko.
Pile o' Meat
I cut the recipe in about half (sort of) & that filled my whole crock pot which is a pretty big one, I can't imagine how big a pot you'd have to have for the full dish! I stuck pretty close to the original recipe though I had to change the cut of pork since my butcher was out of pork shoulders. I also left out a step at the end where you broil the cassoulet with slices of baguette on top & just served it with some bread on the side. It took about 1/2 hour of prep work to get everything ready for the crock pot, then 7 hours of cooking & then 30 minutes of standing time so plan accordingly (I started it around 10:30 am & we ate at 6:30 pm) also the beans need to soak overnight.

Crock Pot Cassoulet
from Williams-Sonoma

1 1/2 c white beans (we used Great Northern)
2 slices thick bacon, cut into 1/2-inch pieces
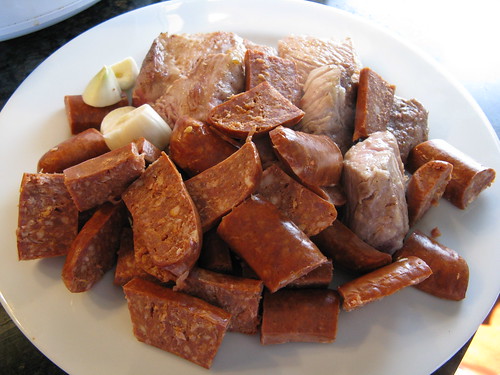
1 1.5 lb bones rib end pork roast, cut into about 8 large pieces
salt & pepper
1 large onion, peeled & chopped
1 c dry white wine
2 T tomato paste
1 14oz can whole plum tomatoes, drained & coarsely chopped
1 c chicken broth
12oz chorizo sausage links, cut in half lengthwise & then into bite-sized pieces
1/2 head of garlic, cloves peeled & cut in half
1 T canola oil
1/2 c panko
2 T fresh parsley, chopped plus extra for garnish

The day before making the cassoulet pick over your beans & put them in water to soak for 24 hours. Drain & set aside.

In a large skillet over medium-high heat cook the bacon until crisp. Remove from the pan & drain on a paper towel, leave the bacon fat in the pan. Set the bacon aside until later.

Generously salt & pepper the pork. Put into the hot skillet & cook until brown on all sides, 7 to 8 minutes. Remove & set aside. Add the onion & a little salt to the pan. Cook until the onion & starting to brown & soft, about 7 minutes. Add the white wine to deglaze the pan. Let the wine & onions simmer until reduced by half, about 8 minutes.

Put the wine & onions into the crock pot. Stir in the tomatoes, tomato paste & chicken broth. Add the pork, sausage & garlic. Set the crock pot to low & cook for about 7 hours, the beans should be tender & the pork should easily fall apart (I checked mine after 5 hours & felt it wasn't cooking fast enough so I turned it up to high for the last two hours which did the trick).

Heat the canola oil in a small skillet over medium-high heat. Add the panko & cook while stirring until golden brown. Season with salt & pepper. Gently fold the panko & parsley into the crock pot. Turn the crock pot off & let sit at room temperature for 30 minutes.

Serve garnished with more parsley & the crispy bacon.

Makes 6 servings

Would we make this again? Yes, its a warm, comforting stick-to-your-ribs dish. The pork was so tender is just feel into pieces throughout the whole dish. The only thing we would change is the chorizo, it doesn't seem quite the right sausage & its flavor really stuck out, next time we'll experiment with a different one.


Wednesday, January 14, 2009

Shortcut Tacos al Pastor with Tomatillo & Chipotle Salsa

Matt bookmarked this recipe from Serious Eats last week to put on this week's dinner menu. It original came from Rick Bayless as a quick way to get the al pastor taste at home quickly.
Shortcut Tacos al Pastor with Tomatillo & Chipotle Salsa
As I've mentioned before Matt loves Mexican food & would love to have it much more often than we do. I like it as well but its often too hot for me to really enjoy. That was almost the problem with this dish, luckily I tasted the salsa before putting it on my tacos & knew right away not to put it on mine at all. Just the chipotle brushed on the pork chops before cooking was enough heat for me & the tacos were flavorful enough without it.

We both really enjoyed the grilled pineapple on these tacos. Pineapple is so tasty grilled & a great accompaniment to the pork. Even though it was just canned pineapple, it was certainly a little touch of tropical in the midst of winter.

Shortcut Tacos al Pastor with Tomatillo & Chipotle Salsa
From Rick Bayless via Serious Eats

4 tomatillos, peeled & halved
2 cloves garlic, peeled & halved
3 - 4 chipotle peppers in adobe sauce
salt
2 boneless pork chops, 1/2-inch thick
1 small can pineapple slices, about 4 slices
1/2 red onion, peeled & sliced
5 tortillas

Heat a skillet over medium heat. Place the tomatillos & garlic in the pan cut side down. Let cook for 3 minutes then flip & cook for 3 more. Put the tomatillos, garlic, 2 chipotles & a pinch of salt in a small food processor. Process until very smooth. Refrigerate until ready to use.
Shortcut Tacos al Pastor with Tomatillo & Chipotle Salsa
Heat a grill pan or grill to medium-high. Process the remaining chipotles with a few drops of water. Use a brush to coat the pork chops with the blended chipotles (we went light with this because of my lack of heat tolerance). Put the pork chops, onion & pineapple on the grill. Cook until the pork chops are done (8-10 minutes).

Remove everything to a cutting board & chop into small pieces. Serve on warm tortillas with the tomatillo & chipotle salsa.

Makes 5 tacos.

Would we make this again? We'll definitely do the pork, pineapple & onion combination again though just use a regular tomatillo salsa instead of this incredible hot chipotle version. 

Tuesday, January 13, 2009

Smoky Sausage & Rice Soup

This soup came about because we had half of a smoked sausage link leftover from another meal & Matt suggested a try making a sausage & rice soup.
Smoky Sausage & Rice Soup
I wanted to play on the smoky flavor of the sausage so decided my main spice would be smoked paprika. Roasted red peppers added another layer of flavor. And finally a touch of cayenne for a pleasant bit of heat. For sometime I just made up as I went along I was really happy with this finished soup. The flavors just seemed to come together perfectly & it had enough body to be a very satisfying main course with just a bit of crusty bread.

Smoky Sausage & Rice Soup

1 T olive oil
1 med, yellow onion, peeled & diced
1 celery stalk, diced
1/2 lb smoked sausage link, cut into bite-sized pieces
1/2 t smoked paprika
1/4 t dried marjoram
pinch cayenne
salt & pepper
3 or 4 strips roasted red pepper, roughly chopped
1 14 oz can whole tomatoes, undrained
2 c chicken or vegetable broth
1/3 c white rice (med or long grain, we used jasmine)

In a medium soup pot heat the olive oil over medium-high heat. Add the onion & celery & cook until the onion is translucent. Add the sausage & allow to brown slightly. Stir in the paprika, marjoram, cayenne and a little salt & pepper. Next add the peppers & tomatoes including the liquid from the tomatoes. Break up the tomatoes with your spoon or squeeze in your hands are adding. Add the broth & bring to a boil. Stir in the rice, cover & reduce the heat to simmer. Let simmer until the rice is cooked about 30 minutes. Check seasoning & add salt, pepper & cayenne as needed.

Makes 3 - 4 servings


Monday, January 12, 2009

Weekly Menu 1/12 - 1/17

I can't believe we've been in Minneapolis for over a year & have never gone out for the local hamburger favorite, the Juicy Lucy (or Jucy Lucy). Never heard of a Juicy Lucy? It's a 1/2 pound burger stuffed with cheese, usually American (though depending where you are you can get other cheeses including Bleu Cheese), that is cooked until the the cheese become a molten core. They warn you when taking your first bite you can really get burned by one of these.
Juicy Lucy
Two places in Minneapolis claim to be the original home of the Juicy Lucy, The 5-8 Club & Matt's Bar & people hotly debate who has the best. Since we were near the 5-8 that's where we ended up for lunch yesterday for our first Juicy Lucys.
5-8 club
Let me tell you this place does one good burger. The Juicy Lucy is a little crunchier on the outside than a regular burger because of the longer amount of time it spends on the griddle. We loved their wonderful soft buns as well.
Juicy Lucy

Smoky Sausage & Rice Soup
Curried Lentil Stew - From Real Food for Real People
Chicken with Root Vegetable Mash
Slow Cooker Cassoulet

This week's cupcake will be Vanilla Cherry.
Related Posts with Thumbnails

Get Email Updates!

Enter your email address:

Delivered by FeedBurner

Measurement Abbreviations

T = Tablespoon
t = teaspoon
c = cup
lb = pound
oz - ounce

Labels

Blog Archive

Contributors

Blog Directory for Minneapolis, Minnesota